Back Office: Integration Hub User Manual
Description: The steps to subscribe to and use the Integration Hub add-on.
Navigation: Log into your Store, then select Upgrade > Manage Plan > Enterprise Level
- At the Enterprise level, purchase the amount of Integration Hub add-ons based on the Store’s needs.
- The new Integration Hub addon will be added in Addons per Site based on the Store.
- Enter the number of licenses (quantity) or increase/decrease with ▲/▼.
- License: After subscribing, you can assign Integration Hub addon(s) (Store level) for the desired Store(s). After confirming, click Save at the upper-right. The confirmation ‘License settings saved successfully’ message appears.
- Note: If you buy Integration Hub based on the number of Stores, it will show how many stores can have access to the Integration Hub as the Max Stores number above the Add-On Store name column header.
- Example: If you buy 1 subscription of Integration Hub, it will be available for only 1 Store. You can then enable the toggle for a Store. If you attempt to enable for more than 1 store, the toggle will automatically disable (slid back to the left and turned grey).
- Note: Not all back-office users can access Integration Hub. Only users with specific roles—such as Browse & Subscribe Integrations, Configure & Manage Integrations, Developer API Key, and Order Webhook—are allowed to access the respective entities in the Integration Hub.
Pro Level
License: After subscribing, you can assign Store-level permission for the Integration Hub by enabling the Integration Hub (toggle on, slid to right and turned pink) for that specific store. After confirming, click Save at the upper-right. The ‘License settings saved successfully’ confirmation message appears.
Navigation: Log in and select a Store. On the Home page, click Integration Hub.

On the Integration Hub page, 4 options are available:
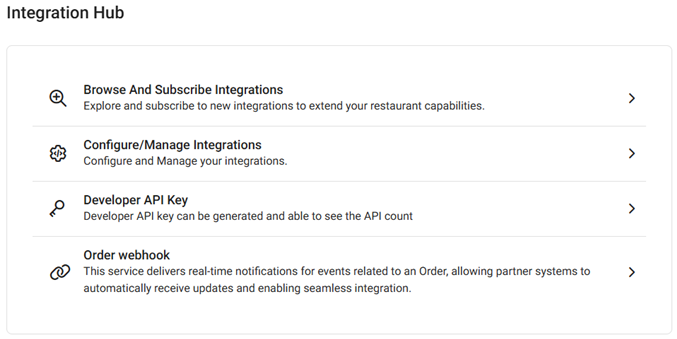
Browse And Subscribe Integrations
- If you are not subscribed to the Integration Hub, clicking the option will direct you to the Integrations page where you can subscribe to the Integration Hub. Upon clicking Upgrade, the page will provide information about the add-ons and prompt you to upgrade. If you have already subscribed to the Integration Hub, you can add integrations by clicking the Add on the corresponding tile.
Configure/Manage Integrations
- When clicked, the Current Integration page appears, which displays the Store’s current Integration.
Adding Integrations/Addons
To add a new Integration:- Click + Add New Integration at the upper-right.
- The Add Integrations page appears. When you find the Integration you wish to add, click the corresponding Add.
- Click Know More to view the user guide for that integration.
- The Disclaimer page appears. After selecting the Terms and Conditions box at the bottom-left, click Confirm at the upper-right.
- The Integration is added to that Store and will appear as a row on the Current Integrations page.
Configuring Integrations
- Once you are subscribed to the integration, it is shown on the Current Integrations page.
- To configure an integration, under the Actions column at the end of its row click its corresponding gear icon.
- The integration’s configuration page appears, with tabs for Settings and Action. Here you can configure the credentials required for the integration.
- After adding or changing any credentials, click Save at the bottom right. The updated credentials are saved, and you’re returned to the Current Integrations page.
Developer API Key
- When clicked, the Developer API Key page appears, where you can see the Developer API Key for the store.
Order Webhook
- When clicked, the Order webhook page appears, where you can set the order webhooks for the store based on the integrations.
Activate / Deactivate
To Deactivate an Integration
- Under the Actions column, click the Delete (trash can) icon.
- The Delete pop-up appears, with options to Delete or Cancel. Select Delete to confirm deactivation of the Integration. Select Cancel to keep the Integration as Active and remain on the Current Integrations page.
To Activate an Integration
- Just above the left side of the table, click the Active button. The Deactivated Integrations appear.
- Under the Actions column, select the icon containing a check mark inside a circle.
- The Activate pop-up appears, with options to Yes, Activate or Cancel. Select Yes, Activate and the Integration will appear as Active on the Current Integrations page. Select Cancel to keep the Integration as Inactive and remain on the Current Integrations page.
Related Articles
Factor4 Integration
Introduction This document provides an overview of the Factor4 Direct API Integration with the POS and Back Office systems. The integration enables seamless processing of Factor4 Gift Card transactions, including card issuance, balance inquiry, ...Wix Integration – User Manual
TO ENSURE THE SYNCHRONIZATION PROCESS RUNS SMOOTHLY PLEASE READ THIS MANUAL BEFORE INTEGRATING WIX WITH THE POS APPLICATION. Attached is a copy of this Manual, including screenshots for use as a visual reference. About This Manual Any navigation or ...Magento Integration – User Manual
PLEASE READ THIS MANUAL BEFORE INTEGRATING MAGENTO WITH THE POS APPLICATION TO ENSURE THE SYNCHRONIZATION PROCESS RUNS SMOOTHLY. A copy of this manual is attached, including screenshots for use as a visual reference. 1. About This Manual • Any ...Magento Integration – User Manual
Magento Integration – User Manual PLEASE READ THIS MANUAL BEFORE INTEGRATING MAGENTO WITH THE POS APPLICATION TO ENSURE THE SYNCHRONIZATION PROCESS RUNS SMOOTHLY. 1. About This Manual · Any navigation or features mentioned in this document might be ...Octopus Integration – User Manual
Octopus Integration – User Manual 1. About this manual · This user manual is specially designed for the user to connect the Octopus with POS application. · Please read this manual before integrating the octopus with POS application to ensure the ...