Back Office: Online Ordering - Account
Introduction
- Sign into the Back Office.
- On the left-side Navigation Panel, select Online Ordering.
- On the Online Ordering page, select Account.
- The Account page allows you to update information on the logged-in Account.
- The right-side Contents panel displays a section breakdown of the Account page: General, Order Settings, Check Out, Theme Settings, Links.
Contents
General
- Account Name – (Mandatory) The name on the Account (typically your business name). It will appear as the Store name by default. The name must be 25 or fewer characters. Letters, numbers and symbols are all allowed.
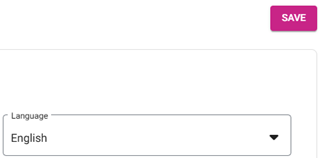
- Language – Select the default language on the Account for the ZenPepper Store.
- Account Logo – Select an image file to upload that will represent the Account’s branding.
- Image File Upload Requirements: .jpg or .png file and max 2MB file size, with a recommended resolution of 400px by 400px
- Banner Background – Select an image file to upload that will be used when confirming the purchase of virtual gift cards.
- Image File Upload Requirements: .jpg or .png file and max 2MB file size, with a recommended resolution of 400px by 400px.
- Web URL – (Mandatory) Enter the desired custom domain name for your website (the part before .lingaros.com) – with a maximum of 50 characters, using only alphanumeric (numbers and lowercase letters) characters
At the subdomain field .lingaros.com will be displayed but not editable- The Launch button will be clickable only when a valid domain is entered.
- When clicked, the message ‘Website is Launched Successfully’ appears. If the entered domain already exists, the messages ‘Sub domain already exists’ and ‘URL is not available’ appear.
- Store Display Limit Distance – Select the range from a customer’s location to find available Stores under your operation (10, 20 or 30 Miles).
Store Display Limit Distance – Select the range from a customer’s location to find available Stores under your operation (10, 20 or 30 Miles).
Order Settings
- Enable ASAP Orders – If enabled (set to YES), it allows customers to select ASAP as an option when ordering online.
- Enable Future Orders – If enabled (set to YES), select the time limit (Days and Hours) on how far out future orders can be placed (enter the numbers or use ▲/▼ to increase/decrease the value.
Check Out
- Enable Sign Up with Facebook – If enabled (set to YES), it allows for customers to create an account using their Facebook account.
- Enable Sign Up with Google – If enabled (set to YES), it allows for customers to create an account using their Google account.
- Allow Guest Checkout – If enabled (set to YES), it allows for customers to submit an online order and complete a Sale without creating an Account.
- Note: Logging in with store credentials will always be available.
Theme Settings
- Menu Layout – Select based on the image size: Default, Large, Small or No Image.
- Theme Color – Select the color of the overall layout (color picker with default colors).
Links
- App Links – Select the checkbox for what app offerings to show (Google Play or (iOS) App Store). When the checkbox is selected, the corresponding Enter URL field will be available.
- Footer Links – Select the corresponding check box for what links to show (Privacy Policy and Custom Link) at the bottom of the page. When the checkbox is selected, the corresponding Enter URL field will become available.
When all updates are made and all mandatory fields are filled-in, click Save at the upper-right of the page. The message ‘Account updated successfully’ appears.


Related Articles
Back Office: Online Ordering - Stores
Sign into the Back Office. On the left-side Navigation Panel, click Enterprise. Then click Online Ordering. On the Online Ordering page, click Stores. The Stores page appears. The Stores page displays a table containing the list of stores under the ...Back Office: Online Ordering - Batch
Sign into the Back Office. On the left-side Navigation Panel, select Online Ordering. On the Online Ordering page, click Batch. The Batch page appears, which displays a table view of Batch transactions. Note: You can conduct a Search, filter by ...POS: Partial Payments in Online Ordering (OLO)
Introduction This article explains partial payments with all payment options (Credit Card / Loyalty Points / Gift Card / Cash) for Online Ordering. Background The Customer can make partial payment using any of the payment options. The toggle Enable ...Back Office: Enterprise - Customers
Sign into the Back Office. On the left-side Navigation Panel, click Customers. Under Customers are options to access pages for Customers or Memberships: Customers Memberships Customers When selected, the existing Customers’ details will be shown as a ...Back Office: Home
Sign into the Back Office. then select a Store. You should be taken to that store’s Home page. If not, then on the left side navigation, click Home. Tip: Type the name of the Store in the Search bar for quicker Store selection. For every Dashboard ...