Back Office: Payroll Report Settings
- Sign into the Back Office.
- On the left-side Navigation Panel, click Settings.
- On the Settings page, under Reports click Payroll Report.
- On the Payroll Report page, 3 tabs appear: Settings, Overtime Settings, and Manage Breaks.
Settings
Over Time Settings
Manage Breaks
Settings
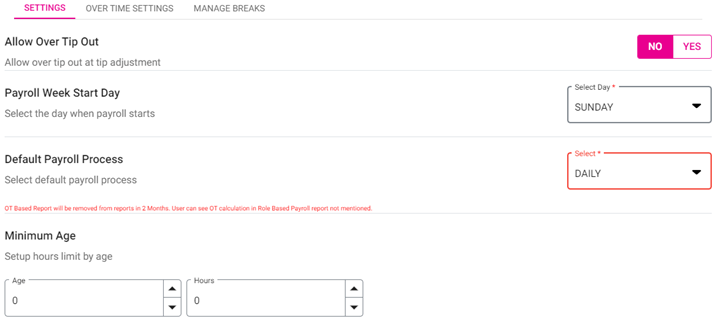
Displays a toggle for Allow Over Tip Out, dropdowns for Payroll Week Start Day and Default Payroll Process, and a Minimum Age with an Hours limit.

- Allow Over Tip Out – Adds a tip adjustment with regards to age. If Enabled (YES), the tip out will be shared at Tip adjustment with the respective employee.
- Payroll Week Start Day – Select the starting day of payroll from the dropdown. All 7 days are available, and you’re only able to select 1 day.
- Default Payroll Process – Select the cadence of the default payroll processing (Daily, Weekly, or Daily/Weekly).
- Minimum Age – Enter the Age (years) and the number limit of Hours – both mandatory. Enter the values, or use ▲ / ▼ to increase/decrease the values by 1.
- Click Save. The ‘Payroll settings updated…’ confirmation banner appears.
Over Time Settings
The + OVERTIME button appears along with a table that has columns for an Overtime’s Type, Effective Date, Hours, Percentage and Actions (with an Edit [pencil] button).

- Click + Overtime. The New Over Time option appears.
- On the New Over Time window, set the selection for the Overtime (Daily or Weekly).
Daily | Weekly |
|
|
Edit  :
:
- If Edit is clicked, the field cannot be edited if it has passed the Effective Date. A pop up appears with Okay and Cancel options, both of which close the window.
- If it has not passed the effective date, the details can be edited.
- Note: Based on the details filled in the payroll report settings, the report will function accordingly.
Manage Breaks
On the Manage Breaks tab, the + NEW BREAK button appears along with a table that has columns for a Break’s Effective Date, Name, Payroll Type, Duration, and Actions (with a Delete [trash can] button).
ACTIVE / INACTIVE – Status indicator just above the Effective Date column.
- When it appears as ✓ ACTIVE, it means currently active Breaks are being displayed.
- When it appears as – INACTIVE, it means currently inactive Breaks are being displayed, which cannot be activated.
- Click + New Break. The New Break window appears.
- Select the Break Name from the dropdown.
- Enter the Duration (Minutes) – Type the value or use ▲▼ to increase/decrease the value by 1 (maximum of 100). Only numbers are allowed.
- Select the Effective Date (calendar view).
- Payroll Type – Select Paid or Unpaid.
- Select what to Apply To:
- All Employees – All employees will be selected.
- Specific Roles – Select one or more Roles or Select all. Click a selected box again to deselect it.
- Specific Employees – Select one or more Employees or Select All. Click a selected box again to deselect it.
- When the new Break details are set, click Save. You are returned to the main Payroll Report screen with the Manage Breaks tab, and the banner ‘Break Settings Saved Successfully’ appears.
- Click Cancel to cancel creating the new Break and return to same page and tab.
- Actions – If Delete (trash can) is clicked, the Delete pop-up with the message ‘Are you sure…?’ appears. Click Delete to confirm and a ‘Break Settings Deleted Successfully’ confirmation appears - or click Cancel to keep the listed Break.
Related Articles
Enterprise Level Payroll Report
Requirement: An option should be included to export the employee payroll report in different format to upload to sage 300 software. Implementation in Back Office: Page Navigation: My Stores >> User Management >> Role A new field “Role ...Back Office: Employee Report
Sign into the Back Office and select a Store. On the left-side Navigation Panel, click Reports then Employee. The Employee report page displays a comprehensive set of data on your staff, with tabs for: Attendance Role Based Payroll Labor Labor By Job ...Back Office: Enterprise - Reports
Sign into the Back Office. On the left-side Navigation Panel, click Enterprise. Then click Enterprise Reports. Under Enterprise Reports are options to access specific reporting Dashboards: Sale Report The Sale Report dashboard contains reporting of ...Updated Account Balance Report
Introduction: The new fields should be included in Back Office (Account Balance) and this will be reflected in Account Balance report. Requirement: · The new fields should be included in Back Office (My Store>> Settings>> Report Settings>> ...Enhancement in Membership Report
Implementation in Back Office: 1) Overdraft item line in membership statement report. Page Navigation: My Stores >> Reports >> Membership >> Membership Statement Report A new field “Membership Overdraft Payment” should be shown in the ...