Build Version 2.1.22 (1.0) - Release Notes
Enhancements in the iPad:
- Auto log off after number of minutes
- An option to logoff the idle POS device.
- System
should validate the Auto log off time in the back-office settings and
should log off the device which are idle for the defined time.
- Custom split button option
- The split by seat and the split by check can be customized by the user.
- User
can either set any one of the split options or they can leave the
“split custom button action” option in back office without choosing any.
- The selected option will reflect in the POS.
- Membership with Discount
- In
the current system while creating a discount, we have an option to map
it to the customer, now the same feature is enhanced to map with the
Membership Plan.
- Reference: Membership with Discount
- Paid status on Split check screen
- In the split screen the "paid" status will be shown at the top of the seat for which the full payment is done.
- For partially paid seat, the status "paid" will not be available
- The existing functionality of split seat and check remain as it is.
- Order screen custom option
- The customers are provided with an option to select 6 the custom button in BO and to configure the sequence to display.
- The options void, print, order, modify are defaulted in the POS check options.
- Reference: Order Screen
- Split payment
- Customer can now do partial payment with the default partial options embed in the payment screen in POS.
- Star printer.
- The following receipt printers are newly added,
- M-pop -Bluetooth & USB • TSP-100 -TCP/IP • SP-700 -TCP/IP
- Note : Check no Barcode is not supported for now.
- Online order -Order values are show as it is in POS which is received from online order.
- Remaining balance on receipt
- The balance due for partial paid checks will show in the bill Print.
Enhancement in Back office:
- Inventory Enhancement phase 1
- Sales recap formula
- An
option is provided for the Account or store admin user to define his
own formula to calculate the Over/Shortage and Cash Expected in Sales
Recap Report.
- Reference: Sales Recap Formula
- Import/export validation
- Validations were done on the import/export sheet to make them user friendly.
- Validations like highlight of the mandatory field and help tips features are embedded.
- Add Address line 2 in customer import sheet
- User can now import the customer info sheet with address line 2.
- They can enter address through the sheet and export it.
- Note:
This change only affect in new customer sheet not for existing. If you
want address line 2 in existing, then you can add a new column.
- IPAD reference removal in BO
- Wherever be the reference i-pad is mentioned in the Back office is now altered to POS.
- Show active checks in Back office.
- The Open Sales (Active Checks) are displayed on the BO “Sales” dashboard of respective stores.
- Reference: Active Checks
- Adjust Inventory import and Inventory reason.
- An excel export and import option to download and update the inventory count.
- Reference: Adjust Inventory
- Auto generate house account number
- In
the current system, we let the user to enter the House Account Number
Manually while creating the House Account and we let the users to edit
the account number at any point of time as Required.
- In
the BO settings a Switch “Auto Generate House Account Number” will be
provided to enable the auto generation Number for the House Account.
Page Navigation: Settings ->Store .>Settings.
- When the switch is enabled, while creating the House account, the House Account number will be generated while Saving.
- When
the Switch “Auto Generate House Account Number” is enabled, system will
not allow the user to edit the House Account Number. While the Switch
is disabled, the user can edit the Account Number (As in the existing
system).
- Loyalty round up features.
- When
the loyalty redeem point is defined with 0 in the decimal part, then
system should round up while redeeming the loyalty point against the
bill.
- Reference: Loyalty Round
- Custom color options.
- Users can able to customize the colors for the display button using “More color” feature.
- And the selected color will get reflect in the POS once sync is done.
- Custom color feature is now applicable to sub-category, menu item and modifier.
- Reference: Custom Color Options
- Issue fixes:
- LIN-11634 In Batch report, batch settled time is show UTC instead of the current time of zone.
- 52742-Low stock alignment in mail is wrong.
- LIN-11639 Menu items are not synced randomly to Inventory.
- Inventory -Bulk Update doesn't show the negative inventory counts.
- Split check duplication issue fixed
- After
the split check, from one device to another device details are not
synced properly, so that duplicate checks are happened this is fixed
now.
- Calculate COGS on Cost Price :
- Existing Functionality:
For each sale of the menu item mapped with the inventory item and for retail items which has “Calculate COGS on Cost Price” enabled, then the Quantity will not get deducted from the Inventory. - Revised Functionality:
- Even
if the option “Calculate COGS on Cost Price” is enabled for the
inventory item and retail items, inventory quantity gets deducted from
the inventory reports.
Membership with Discount
Introduction
In
the current system the discount will be defined on store wise and the
user has provided with an option to define the discount only for the
registered customer.Requirement
Need an option to define the customer on group wise
Suggested Approach.
- The Membership plan will be created on the store basis.
- The Created Membership plan will be attached to the customer.
- In the discount the user will be provided with an option to map the membership plan to the customer.
Changes in the Back Office.
Creating the Membership Plan- A new sub menu Membership Plan will be provided in the below page navigation.
Store-> Customer -> Membership Plan - While selecting the membership plan the below field will be displayed.
Name- Membership Plan
Date- The plan created date
Control- To edit or delete - The user can create a membership plan by clicking on the
icon.
Screen Layout
Mapping Customer to the Membership Plan.
- Once the Membership plan is created, the user can map the membership plan to the customer in Customer Master.
- The created membership plan will be listed in the drop down.
- The user can select a maximum of one plan to each customer
- The user can map the same membership plan to Multiple Customer
Screen Layout
Defining discount to the Membership Plan
- In
the current system while creating a discount, we have an option to map
it to the customer, now the same need to be enhanced to map with the
Membership Plan.
- A new Field “Membership Plan” will be added in the Discount screen.
Page Navigation: Product/Item -> Discount - The Membership Plan can be mapped to Item Based, Check Based, Open item, Open check and Mix Match discount.
- The Membership Plan will be an non-mandatory field.
- The Membership Plan created need to be displayed in the drop down.
- The user will be provided an option to select more than one plan.
Screen Layout
Validation in POS
- The Membership discount will be validated only for the customers to whom the respective membership plan is attached.
- While
adding an item to the check system will validate whether the selected
customer has any membership discount, and if the discount is available
then system will apply the same while the item or check meets the
discount criteria defined in the BO.
Order Screen
Introduction
In
the current system the payment method will be configured in the BO and
the payment will be processed in the iPad after selecting the payment
and card type.In POS application we have let the users to have a 9 Custom button in which 6 will be configured in BO and 3 will be default custom button.
Requirement
The customer need to be provided with an option to select 6 the custom button in BO and to configure the sequence to displayChanges in Back office
- In the back-office settings, “iPad Custom Button Action” need to be renamed as “POS Custom Button”.
Page Navigation: Settings -> Store -> Settings. - The
user will be provided with 6 Drop down menu to select the required
custom button against the sequence number that need to be displayed in
the iPad.
- System should let the user to save only after selecting all 6custom button.
- In the Drop-down system should display the below options to select.
- Print
- Discount
- Order
- Search
- Cash
- Modify
- Void
- All configured Payment mode for the Store
Screen Layout
Changes in POS.
- The custom button in the POS need to be displayed as configured in the back office,
- By Default the 7,8 and 9th button will be Option, Payment and Log off.
- If
the custom button in the back office is selected as Void, Print,
Discount, MPPG, Order and Cash then in the iPad system should display as
below.
- While clicking on the MPPG, system will be navigating to the TIP screen.
- And
after selecting the tip, system will be navigating to the Card payment
screen, where the user can swipe or enter the card details to process.
- In
the Existing Option Button the following options should be added PRINT,
ORDER, VOID, MODIFY. While selecting these button, system should follow
those existing functionality.
Screen Layout
Note:
- In the BO, the existing order in iPad should be configured for the POS Custom Button
- While configuring in BO, system should not let the users to select the same option more than Once.
- In the POS Option custom button, the following buttons need to be added Void, Print, Order and Modify.
Sales Recap Formula
Introduction
- In the current system, the over/shortage in the Sales Recap report is calculated by the below pre-defined formula.
- Over/Shortage=
Cash drop +Paid in – (Paid out+ Delivery charges+ Driver Tip + Employer
Tip + Cash Drop amount + Cash Refund + Closing Balance).
- Closing
Balance- If the “Exclude opening balance Calculation” is enabled in the
Sales Recap Settings, then system should exclude the
- “Cash Draw Amount” in the closing balance else the “Cash Draw Amount” should be added along with the closing balance.
- Existing formula for Cash Expected:
Cash Expected= Cash Amount + Paid in + Cash Drawer- (Paid Out + Cash Drop + Delivery Charge + Refund + Driver Tip +Total Tip Paid out. - If “Exclude opening balance” calculation is disabled, then system wont consider “Cash Drawer” for calculation in Cash Expected.
- If
“ Tip & Gratuity included in Cash Expected” is disabled then system
wont consider the Total Tip Paid Out” for calculation in Cash Expected.
Requirement
Option
need to be provided for the Account or store admin user to define his
own formula to calculate the Over/Shortage and Cash Expected in Sales
Recap Report.Changes in Back office:
- The
new switch will be provided for the user to enable or disable the
formula definition for Over/shortage and Cash Expected calculation in
Sale Recap Report Settings page.
Page Navigation: Setting -> Store ->Sale Recap Report Settings. - While
enabling the button system will enable 2 Text box individually where
user can define the formula for Over/Shortage and Cash Expected in the
sales Recap report.
- By default, the existing formula will be displayed in the text box.
- The user will be allowed to either select or delete the field
- The user will be allowed to select more than 1 field in the text box. (ie) Multi select option will be provided.
- In Text Box1 the user can define the field which need to be added.
- In Text Box2 the user can define the field which need to be subtracted.
- The user can select the table name from the drop down.
- The Formula definition button and the formula need to be validated only after Update.
Validations for Over/Shortage:
- System should not allow the user to select the same field in both Addition and Subtraction Table.
- System should not allow the user to select the field more than once.
- While enabling the Formula Definition switch, system should not validate the “Exclude Opening Balance Calculation”
- While
disabling the Formula definition in the Sales Recap Settings, system
should not validate the user defined formula, system should calculate
the default formula defined by the system and need to update the same in
the Text box.
Validations for Cash Expected.
- System should not allow the user to select the same field in both Addition and Subtraction Table.
- System should not allow the user to select the field more than once in the same text box.
- While
enabling the Formula Definition switch, system should not validate the
“Exclude Opening Balance Calculation”, “Include Tip charges in cash
expected” and “Tips & Gratuity in Cash Expected”
- While
disabling the Formula definition in the Sales Recap Settings, system
should not validate the user defined formula, system should calculate
the default formula defined by the system and need to update the same in
the Text box.
Fields to display for Over/Shortage and Cash Expected
- Cash Amount
- Paid in
- Paid Out
- Delivery charge
- Driver Tip
- Tip Paid Out
- Cash refund amount
- Cash drop amount
- Opening Balance
- Closing Balance
Screen Layout
Sales Recap Setting
Sales Recap Setting
Cash Expected
Active Checks
Introduction
In the current system we are displaying the NET SALES (closed checks) on the BO stores “Sales” dashboard.
Now we need to include the Open Sales (Active Checks) on the BO Stores “Sales” dashboard.
In the current system we are displaying the NET SALES (closed checks) on the BO stores “Sales” dashboard.
Now we need to include the Open Sales (Active Checks) on the BO Stores “Sales” dashboard.
Changes in back office
- A check box will be enabled in the sales dashboard, to select whether the user needs to see the Active checks or not.
- If the check box is selected, the open sale(Active checks) value need to be displayed along with the NET Sale.
- While selecting the Net Sales Tile, system should display the table with below field along with the existing table
- Column NameInputDateThe Date selected in the FilterTableThe Table name for which the Bills are yet to issueNet SaleThe net open bill value for the corresponding tableTaxThe Tax value for the open billDiscountIf there is any discount applied to the bill, then the discount value need to be displayedGrand SaleThe overall value of Net Sale+ TAX – Discount or Net Sale- Discount + Tax (based on the parameter setting)
- The existing Table need to be titled as Net Sales and the new table need to Titled as “Active Check”
Screen layout
Adjust Inventory
Introduction
In the current process, the user can either adjust the inventory on item/Sub-recipe wise and Bulk UpdateRequirement.
An excel export and import option to download and update the inventory countChanges in Back office
- An option to export the items in the excel will be provided at the Adjust Inventory UI.
- While Exporting with the Type selected as Item, then system should export the excel with the following rows.
Name
Reason Type
Inventory Count
Vendor
Notes - If the type is selected as Sub Recipe then, the exported excel should have the following rows.
Name
Reason Type
Inventory Count
Notes - The
Reason Type, Vendor and Notes column is a array field, so If the field
has than 1 value then the same will be exported and imported with comma.
- If
the user is updating the Inventory count for 3 vendors and have
selected only one reason, then system will update the stock only for the
1st vendor.
- If the user is
updating the Inventory count for 3 vendors and have given only one
Notes, then system will update the same notes and update the stock for
all the vendors.
- While
import system will validate the available qty for the items which need
to be decreased and if the entered qty is more than the available qty
system will skip the item for adjustment.
- For import all the rows will be validated as a mandatory row.
- The 1st sheet of the import and export sheet will have the user guide.
- The sheet 1 Name need to be User Guide.
User Guide Story
Screen Layout
Adjust Invenoty Item
Export Format
For Item
For Sub Recipe
Import Format
For Item
For Sub Recipe
Loyalty Round
Introduction
In the current system, the check amount will be redeemed as per the redemption configuration in the Back office.Existing Functionality
Lets Assume the loyalty redemption is defined as below.
Scenario 1:
Loyalty Redeem points at: 0.50The Check Total is $9.50
The available loyalty point for the customer is 5 (Which means customer can redeem loyalty for 10$)
In this case the customer will able to redeem the loyalty point for the full check value, and after redemption the available loyalty point will be updated as 0.50
Scenario 2:
Loyalty Redeem points at 1.00The bill value is $9.50
The available loyalty point for the customer is 10 (Which means customer can redeem loyalty for 10$)
In this case the customer will be allowed to redeem only for 9$ and need to pay 0.50 in cash/card. And after redemption the available loyalty point will be updated as 1.
Requirement:
Example with Scenario 2:
Loyalty Redeem Points at 1.00The bill value is $9.50
The available loyalty point for the customer is 10 (which means the customer can redeem loyalty for 10$)
In this case, if the bill value is lesser than the loyalty value (9.50 > 10) while doing redemption the bill value is round up to nearer high value (9.50 as 10). After redemption the available Loyalty value for that customer will be updated as 0.
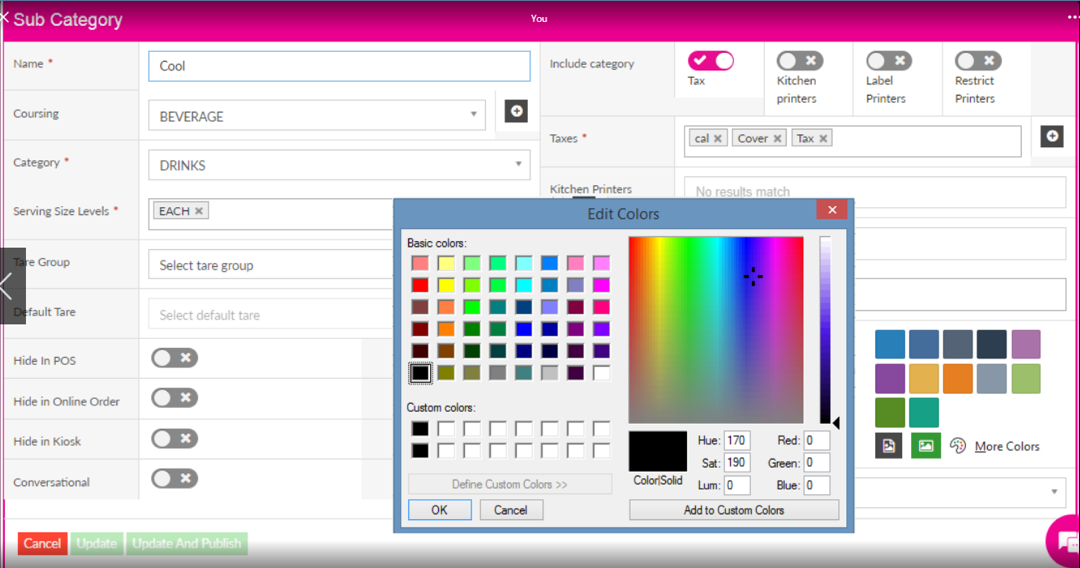
Custom Color Options
Introduction- Custom Color Option.
In the current system, the color options in “Display Button” field is limited to 12 colors. Customers can able to choose colors from the provided 12 colors.Requirement
The customers need to be provided with “More Colors” option to choose whatever color they want to use in “Display Button” field.Changes in the Back Office
- New option “More colors” is displayed along with “select image from disk” and “select image from gallery”.
- When
user click onto the “More colors”, a new “Edit colors”(as in Microsoft
office) dialogue box should pop-up, which allows user to choose any
colors as they wish.
- Edit
colors pop-up box contains “Basic colors” from which user can choose the
preferred color. The preview of selected color should be displayed at
the left side of “Basic colors”.
- The color/solid box is filled with the color chosen by the user.
- Also, user can able to adjust the Hue, Saturation and Luminosity of the selected color by dragging the arrow at the left side.
- By click on to “Add to Custom Color” the edited color should get added to the Custom Colors, which customer can use later.
- The changes will be done in the “Display Button” field of the following screens,
- Subcategories.
- Modifiers.
- Menu Item/Retail Item.
- Display Groups.
- Discounts (Item based, check based, open item, open check, Mix and match).
- Table Layout -> Background color.
Screen Layout
Related Articles
Build Version 2.1.24 (1.0) - Release Notes
Release Date: 07/09/2020 Release Version: 2.1.24 (1.0) Enhancements: · Auto Update for POS - Auto update will allow the system to prompt for each new software update automatically - A Notification for update to latest version ...Build Version 2.1.22 (1.3) - Release Notes
Release Date: 4/28/2020 Release Version: 2.1.22(1.3) Enhancements: · Delivery Notes are Printed on the Receipt Print Out - The delivery notes are now added to the receipt print as well as in the delivery print for driver · ...Build Version 2.1.22 (1.5) - Release Notes
Release Date: 5-15-2020 Release Version: 2.1.22 (1.5) Enhancements: · Curbside Pickup Option - A new pickup order type Curbside Pickup should be added to the existing pickup service options - The store timings are the same for ...Build Version 3.0.7 (1.3.1) - Release Notes
Release Date: 29-Sept-2021 Release Notes: iPad Build version 3.0.7(1.3.1) Feature Back Office: Account Balance Codes and Report - Enhancement Provision to include new field “Comp Discount” in Back Office (My Store>> Settings>> Report Settings>> ...Build Version 2.1.22 (1.2) - Release Notes
Release Date: 4-20-2020 Release Version: 2.1.22(1.2) Enhancement: · NMI Refund: - There is now an option to delete the online order payments made via NMI gateway - The User can delete the online order payment in the POS under ...