Retail Back Office: Inventory - Purchases
Navigation: Sign into the Back Office for your Retail Store, then select Inventory > Purchases.
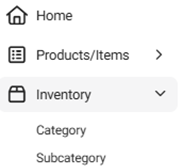
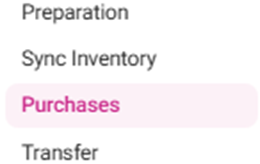
The Purchases page appears, with sub-page options for Purchase Templates, Purchase Orders, Purchase Invoices, Received Items, and Expired Purchase Item.
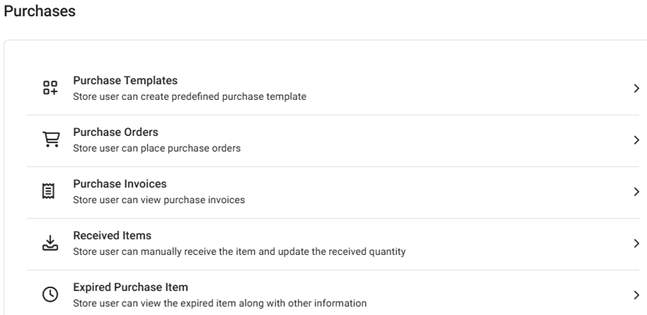
Purchase Templates
Purchase Orders
Purchase Invoices
Received Items
Expired Purchased Item
Purchase Templates
You can save a Template with Vendor details and frequently ordered items. After that, you can use the Template to make Purchase Orders in future for those items. The page contains a table of currently existing Purchase Templates, with the following columns:
- Name – The Name of the Retail Item
- Vendors – The selected vendor from the options assigned under the Store
- Actions – A Purchase Order can be placed, or the Purchase Template can be Edited or Deleted.
Select + New Purchase Template to create a new Purchase Template (or click the corresponding three dots [•••] then Edit under Actions to update an existing Purchase Template). The New / Update Purchase Template pane appears.
General
- Name – (Mandatory) The name of the Purchase Template
- Vendor – (Mandatory) Select a Vendor from the dropdown list of registered Vendors.
- Vendor Address – The selected vendor’s address from the dropdown.
- Ship To – The selected Store’s Address, pre-populated from Store Information.
Items To Be Ordered – Contains a table with columns and the + Add Inventory Item option. Select it for a new Inventory Item row to appear.
+ Add Inventory Item will not be clickable unless a Vendor was selected
- Item – Select an item (registered for the particular vendor) from the dropdown. When an Item is selected, the Brand, Quantity, Unit Price, Tax, and Total will be populated.
- SKU Code – The item’s SKU Code.
- Brand – Select from the dropdown if different from the pre-populated value.
- Quantity – Enter the desired numeric value and/or select ▲/▼ to increase/decrease the value.
- Unit Price – Previously defined price of the Item (cannot be altered or changed).
- Total – The value of the formula = Price (Quantity x Unit Price) + Tax. Auto-updates based on the entered Quantity.
- TOTAL – Below the table to the right. The value is the sum of all Total values in the table.
- When satisfied with the Purchase Template, select Save (or Update).
Purchase Orders
On this page, you can place an Order to the Vendor for the items that you want to purchase. Select the Vendor, Status, and Time Period from the dropdowns then select Apply to populate the table with the following columns:
- Purchase Order ID – The unique ID Number (generated when the PO was created)
- Vendor – The name of the Vendor
- Order Date – The Date the PO was submitted
- Status – The PO’s Status (Placed, Partially Received, Received or Cancelled)
- Actions – The below options are available:
- Print – When selected, the Print screen appears. It displays details of the created PO: Date (Current Date), Vendor Name (with address if provided), Ship To address, Order ID, Receive Date (as in expecting date). Placed Order details such as S. no, Barcode/SKU, Name of item, Quantity, Unit Price, Price, Tax, Total, and Total (of all items on the PO).
- Edit (or select + New Purchase Order to create a new Purchase Order). The New / Update Purchase Order page appears.
- Vendor – If a new PO, select from the dropdown. If an existing, it will be greyed out.
- Date – Select the date the PO was received.
- Place Order Via – Select Email or Print.
- Vendor Address and Ship To – Auto-populated based on the selected Vendor.
- If you’re adding Inventory Items, select + Add Inventory Item.
- To delete an Inventory Item from the PO, click the corresponding trash can of the row line item.
- On the main screen, the status will be changed from Placed to Modified.
- When a partially received PO is edited, on the received PO screen the previously received field will appear with Date and Time [MM/DD, YYYY 0:00:00 AM/PM format].
- If a previously received PO is selected, it will expand with Order Details such as Date, Item Name, Quantity, Price per unit.
- Receive – The Receive Purchase Order screen appears, with the following fields:
- Vendor – The name of the vendor created during inventory item
- Place Order Via – How the PO is being communicated (Print or Email), set during PO creation
- Vendor Invoice No – The Vendor Invoice Number can be entered in the field
- Receive Date – Select the receive date for the PO (calendar view)
Ordered Items - This section contains a table with the following columns: - Item – The inventory item(s) added to the PO
- SKU Code – The unique code assigned to the selected Item
- Vendor Brand – The name of the Vendor and Brand the Item was assigned to
- Quantity – The quantity of item selected during PO creation
- Price – The price set during PO creation, based on the Quantity and Price Per Unit.
- Price Per Unit – The price of each item based on configuring during PO creation
- Received Quantity – The amount of the item being received set during the PO creation
- Received Price – The value = Price Per Unit * Received Quantity, with the Total shown for the Received Price column
- Primary Storage – Storage which is set during creation of the inventory item. If no storage is selected during that time, it can be selected from the dropdown.
- Secondary Storage – Storage created storage location will be displayed in the dropdown.
- Total – The Total amount for the item.
- Cancel – When selected, the Reminder pop-up with the message ‘Are you sure’ appears with two options:
- If Yes, the ‘Purchase order cancelled’ message appears and the PO is deleted
- If No, no changes will happen
- Check Logs – The Logs screen appears with details such as PO ID and Vendor Name, then a log with each listing showing the Event (Placed / Received / Modified), Date (and Time) the PO was placed and received, and User (user name and store name).
- Repeat Order – A New Purchase Order screen appears that will be pre-populated similar to an Edit screen. Confirm the information on the screen then select Place Order.
- Save As Template – A New Purchase Template page appears (under Purchase Templates).
- Enter the Name of the template
- Confirm the Vendor, Addresses and Items to Be Ordered.
- Once ready to create the template, click Save.
- You are taken to the Purchase Template page appears, with the message ‘Purchase template Saved Successfully!’ appears, and the PO Template will be visible as a Purchase Template.
Purchase Invoices
Displays a table of Invoices (Order details of all the Purchase Items), with the following columns:

- Purchase Invoice ID – The unique ID for the Invoice.
- Invoice Number – The invoice number generated from the POS. It can be generated from the Receive Inventory Item page.
- Received Date – The Date & Time the invoice was received.
- Ordered Date – The Date & Time the PO was created.
- Vendor – The name of the vendor attached to the invoice.
- Vendor Invoice Number – The number of the vendor’s invoice (mentioned in the PO).
- Last Updated On – The Date & Time a purchase or (repeated order) is made from PO.
- Status – The status of the Invoice (Received, Edited, etc.)
- Actions – Select the pencil icon to Edit an existing invoice. The Edit Purchase Invoice page appears, where only the Vendor Invoice field can be edited. Other fields will be grayed out. The table below contains the following columns:
- Item – The name of the item added to the PO
- SKU CODE – The item’s corresponding unique number
- Vendor Brand: The name of the Vendor and Brand attached to the inventory item
- Quantity – The quantity of item provided while creating items and during purchase order creation
- Price – Price configured during PO creation based on the Quantity and Price Per Unit
- Price Per Unit – Price per unit which is configured during purchase order.
- Received Quantity – The amount of items added to the PO, set during PO creation
- Received Price – The value of Received Quantity * Price Per Unit, along with Total.
- Primary Storage – Storage selected during creation of the inventory item.
- Secondary Storage – Secondary location where the item is stored, if applicable.
- When done editing the Purchase Invoice, select Save at the upper right. You revert to the main Purchase Invoices screen, with the message ‘Invoice Updated Successfully’ appearing at the upper right.
- Select the left-facing arrow [<-] next to the Edit Purchase Invoice header to close without editing.
Received Items
You can manually receive the Orders that were not placed under the Purchase Orders page.
- Example: You just placed an Order with a Vendor then emailed them. Once the Order is received, access the Received Item page to manually receive it in the Back Office.
Select the Type, Consumption Status and Time Period from the dropdowns then select Apply to populate the table with the following columns:
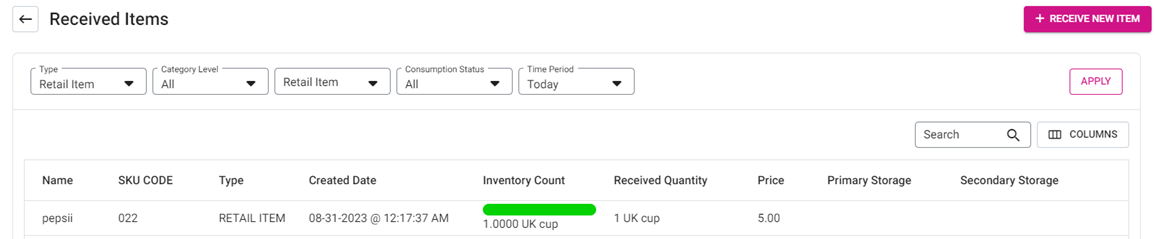
- Name – The name of the inventory item (created under the Inventory section).
- SKU CODE – The item’s unique code
- Type – The type of Item (Inventory Item, Retail Item or Sub Recipe).
- Inventory Count – The available quantity of the Item
- Received Quantity – The amount of the item that received (set during PO creation)
- Price – The item’s price value will be displayed.
- Primary Storage – Where the inventory item is primarily stored (selected during creation of the item). If no storage is selected during creation, one can be selected in the dropdown.
- Secondary Storage – Where the item is secondarily stored, if applicable.
Select + Receive New Item to create a new Received Item. The Receive New Item pane appears, with X Close at the top right and Cancel at the bottom left. The Save button will be disabled until all mandatory fields are filled.
- Barcode/SKUCODE – The unique code that represents the item. Can be pre-populated based on the selected Inventory Item, or manually entered.
General - Inventory Item – Select from the dropdown. Other fields auto-populate based on the selection.
- Vendor – Displays the vendor based on the Inventory Item selection.
- Brand – The item’s brand name, based on the Inventory Item selection.
- Vendor Invoice No – Enter any invoice number related to the vendor and item, if applicable.
Price - Quantity – Enter the quantity of the item to be purchased, or use ▲/▼ to change the value.
- Price – The total Price, which = Quantity * Price Per Unit.
- Price Per Unit – The price of a single item. Auto-populates based on Inventory Item selection.
Storage - Select the Primary Storage from the dropdown (if not already auto-populated), and the Secondary Storage (if applicable).
- When ready to create the new Received Item, select Save at the bottom-right. You are returned to the Received Items page showing the new Received Item and the confirmation banner ‘Receive Item Saved successfully’ appears.
- Select Cancel at the bottom-left (or X Close at the top-right) to close the pane without creating the Received Item.
Expired Purchased Item
- If tracking is enabled when an Inventory Item is added, any expired items will appear on this screen.
- For the receiver’s PO, the Expired Date for a Purchase Item can be selected, so that Date will be displayed. Details of each item are displayed in table format with the following columns:
- Inventory Item – The inventory item for the expired purchase item.
- SKU Code – The unique code of the item.
- Purchase order ID: PO ID generated from when a new PO is placed.
- Lot/Serial Number – The Lot/Serial Number for the order (created from Inventory item only when tracking is enabled). It is set by the customer in Inventory item and can be configured in received purchase order.
- Vendor – The name of the vendor for the respective inventory item will be shown here.
- Purchase Date – The Date the inventory item was purchased.
- Expiry Date – The Date the inventory item expires (set during purchase).
- Expired Quantity – The amount of the inventory item that expires (any leftover quantity that has passed the Expiration Date).
- Wastage Quantity – The amount of expired quantity which was deleted from the control will be shown here (it will have an impact in wastage reports).
- Status – Whether the inventory item was Deducted or Not Deducted.
- Action – The option to Delete will be available.