Wix Integration – User Manual
TO ENSURE THE SYNCHRONIZATION PROCESS RUNS SMOOTHLY
PLEASE READ THIS MANUAL BEFORE
INTEGRATING WIX WITH THE POS APPLICATION.
PLEASE READ THIS MANUAL BEFORE
INTEGRATING WIX WITH THE POS APPLICATION.
Attached is a copy of this Manual, including screenshots for use as a visual reference.
About This Manual
Any navigation or features mentioned in this document might be obsolete based on latest upgrades to both the POS and Wix software.
Requirements
The below set up is required before enabling and using this integration:
- A Wix E-Commerce Account and access to the Storefront site.
- A Marketplace subscription to POS Back Office (BO).
Wix
Generate API Keys
• API Keys enable POS BO access and manipulate data from the Wix site.
- Log in to your Wix Account.
- Select your profile icon at the top-right then select Account Settings.
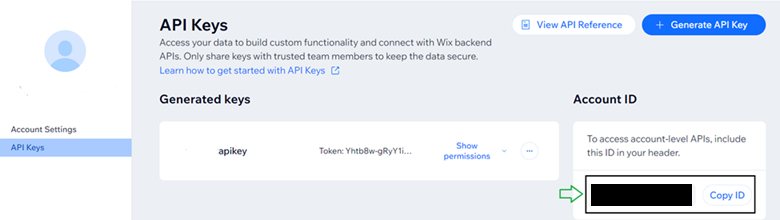
- On the Account Settings page: select API Keys then select the Generate API Key button.
- Enter a Name then select Wix Stores and Wix eCommerce permission and select Generate Key at the top-right. Make sure you copy the Token before closing the pop-up containing the Token. If you forgot the Token, it can be generated again.
Account ID
The Account ID barcode is found on the API Keys page.
Site ID
Launch your site by selecting All Sites in header panel and select your Store.

The Site ID for a current Site can be obtained from the URL in your browser.
- Example: this Site’s ID appears after the /dashboard/ part of this URL.
POS Marketplace
Subscribe to Wix Integration
Select Marketplace from the left-side navigation. Select Browse and Subscribe Integrations then select the Wix integration.

Configure Wix Integration
- Navigate to the Configurations / Manage Integrations page. For the Wix row: under Actions click the Settings (gear) button to configure the integration.
- Paste the Site ID, Account ID and API Key from the previous step. Once all 3 mandatory fields are filled in and confirmed, click Save.
Push Product and Inventory Data to Wix
Before you sync for the first time, ensure your Products/Items and Inventory are updated in Back Office.
You can take 3 actions from the Action tab towards Wix Integration.
- Sync Categories - Sync newly created Categories.
- Sync Products - Sync newly created Products and tag the Products under the corresponding Categories.
- Sync Stocks - Update the Inventory count of all the products that are already synced with Wix. The button can be clicked at any time to sync the latest Stock count with Wix. Stock count will be automatically synced with Wix site on POS during sale and inventory adjustments.
Online Orders
Online Orders placed through Wix storefront and Wix admin portal will be pulled every 15 minutes and displayed under the Online Orders section in POS (Sale History > Online Orders). Inventory will be updated with stock count based on the items and its quantity in the order.
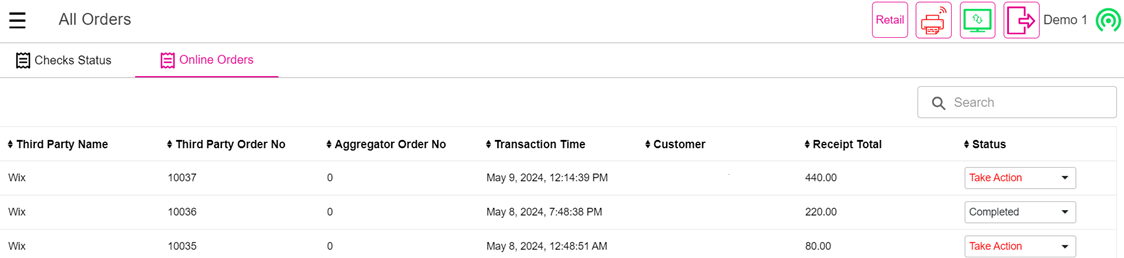
- You can mark an order Completed if the Order is executed.
- You can mark it Cancelled if the Order will not be executed (which reverts to the previou
Related Articles
Magento Integration – User Manual
Magento Integration – User Manual PLEASE READ THIS MANUAL BEFORE INTEGRATING MAGENTO WITH THE POS APPLICATION TO ENSURE THE SYNCHRONIZATION PROCESS RUNS SMOOTHLY. 1. About This Manual · Any navigation or features mentioned in this document might be ...Magento Integration – User Manual
PLEASE READ THIS MANUAL BEFORE INTEGRATING MAGENTO WITH THE POS APPLICATION TO ENSURE THE SYNCHRONIZATION PROCESS RUNS SMOOTHLY. A copy of this manual is attached, including screenshots for use as a visual reference. 1. About This Manual • Any ...Octopus Integration – User Manual
Octopus Integration – User Manual 1. About this manual · This user manual is specially designed for the user to connect the Octopus with POS application. · Please read this manual before integrating the octopus with POS application to ensure the ...Back Office: Integration Hub User Manual
Description: The steps to subscribe to and use the Integration Hub add-on. Navigation: Log into your Store, then select Upgrade > Manage Plan > Enterprise Level At the Enterprise level, purchase the amount of Integration Hub add-ons based on the ...Factor4 Integration
Introduction This document provides an overview of the Factor4 Direct API Integration with the POS and Back Office systems. The integration enables seamless processing of Factor4 Gift Card transactions, including card issuance, balance inquiry, ...