Back Office: Driver Report
- Sign into the Back Office and select a Store.
- On the left-side Navigation Panel, click Reports then Driver.

- On the Driver page, make the following selections:
- Driver: Select a Driver from the list of employees (who have the Driver role assigned).
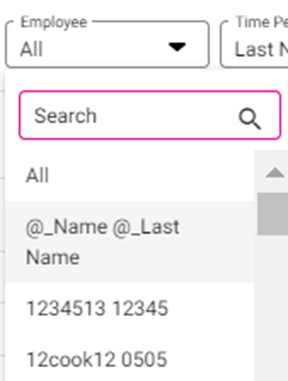
- Time Period - Select a Time Period from the dropdown:
Today – The report will run based on Today’s store business date.
Yesterday – The report will run based on yesterday’s store business date.
Last ‘N’ Days [Enter the number of Days, type the number or use ▲▼ to change the value by 1] – The report will run based on the entered days.
This Week [Default] – Just the current week is displayed (if the report is run on Tuesday then from Sunday to Tuesday will be displayed).
Last Week – The last week is displayed (from Sunday – Saturday or Monday – Sunday).
Last 7 Days – Report will run based on from Today’s Date to last 7 Days.
This Month – Just the current month will be displayed.
Last Month – Just the previous month will be displayed.
Last 30 Days – Report will run based on from Today’s Date to last 30 Days.
Specific Date [Select the specific Date (Calendar View)] – Report will run based on the selected Date.
Date Range [Select the From and To Dates (Calendar View)] – Report will run based on the From to To Dates. The From Date should be prior to the To Date.

- After selecting the Date and Time Period, click Apply at the upper-right. The Driver table is populated with the following columns:
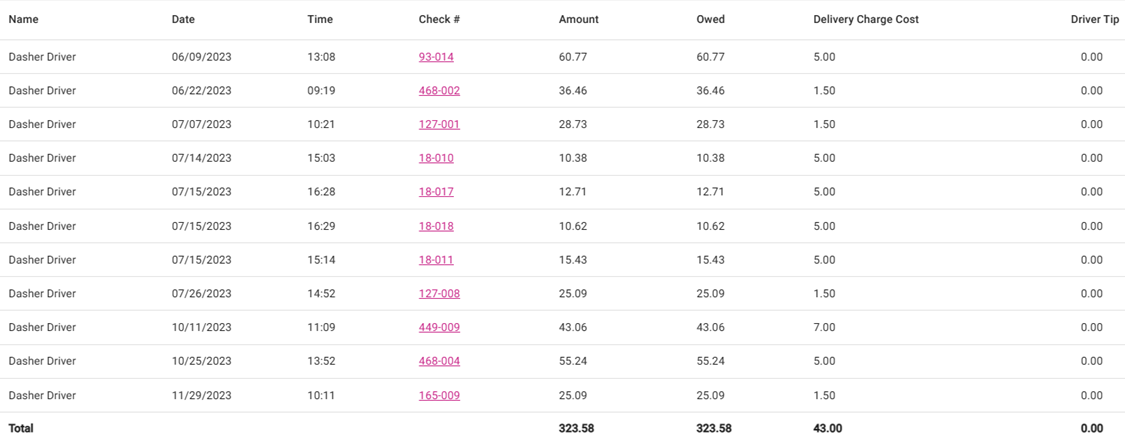
Name: Name of the driver assigned to the check.
Date: Date of the delivery (DD-MM-YYYY format).
Time: The time the order was delivered by the driver (00:00AM/PM format).
Check #: This check number for the delivery order. Clickable which displays the Check Details window.
Amount: The total amount of the check (with currency symbol).
Owed: The total amount owed by the driver (no card payments).
Delivery Charge Cost: Based on the percentage set in Driver Settings (Delivery Charge Compensation to Driver).
Driver Tip: Any tip provided to the driver during online ordering.
Total: Sums of the values in Amount, Owed, Delivery Charge Cost, and Driver Tip.
Select a Check # to navigate to a page that provides more information about the Check.
- Email Receipt Copy - Click Send Receipt to email a copy of the Check to the auto-populated Email Address.

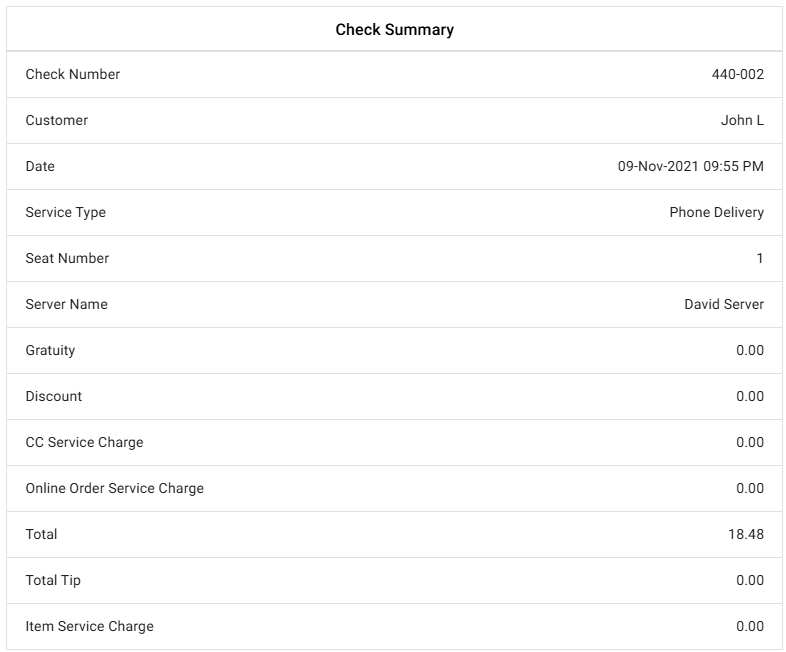
- Check Summary Table - Contains high-level information about the Check, including Number, Customer name, Date, Service Type, etc.
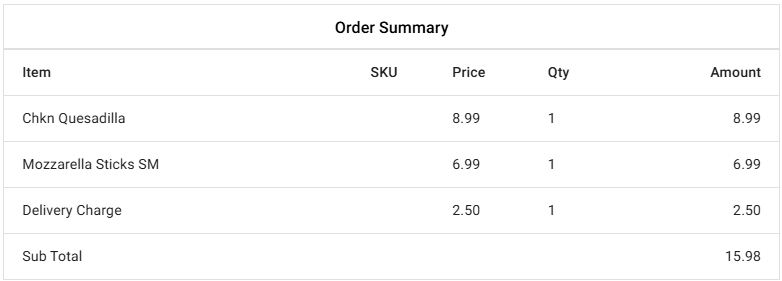
- Order Summary Table - Contains an itemized view of the Order, including each item's name, price, quantity ordered - and amount.
- Tax Summary - Contains an itemized view of the Taxes added to the Check.

- Payment Summary Table - Contains an itemized view of the payments applied to the Check, including the type, any tips or service charges, Amount paid, etc.

- When done reviewing the Check, click Back next to the Check No to return to the main Driver report screen.

Related Articles
Back Office: Employee Report
Sign into the Back Office and select a Store. On the left-side Navigation Panel, click Reports then Employee. The Employee report page displays a comprehensive set of data on your staff, with tabs for: Attendance Role Based Payroll Labor Labor By Job ...
Back Office: Sale Report
Department Category Sub Category Menu Item Modifier Hourly Daily Sale Recap Cashier Out Online Sales Weekly Summary Sale Summary Future Order Department The default tab on the Sales Report screen. It shows data from all Departments by default, with ...
Back Office: Account Balance Report Settings
Sign into the Back Office then select a Store. On the left-side Navigation Panel, click Settings. On the Settings page, under Reports click Account Balance. The Account Balance page contains multiple fields to fill in. Enter a value in each field ...
POS: Phone / Web Orders - Cashier Report for Driver
Back Office Navigation: Log into BO, select a Store, then navigate to Settings > Application > Delivery If the toggle is enabled (set as YES), the Sale will be assigned to the Driver and will only include Sales from Delivery Orders. Those Order Sales ...
POS: Phone / Web Orders - Reassign Driver
In the current POS system, users can already reassign Drivers for Orders in the New tab. Similarly, the same functionality is extended to the Out tab, allowing users to reassign a Driver for an ongoing Check that has already been dispatched or out ...