Retail Back Office: Payroll Report Settings
Navigation: Sign into the Back Office. On the left-side Navigation Panel, click Settings. On the Settings page, under Reports click Payroll Report.
On the Payroll Report settings page, 3 tabs appear: Settings, Overtime Settings, and Manage Breaks.
Settings
Over Time Settings
Manage Breaks
Settings
Offers the following toggle options:
- Payroll Week Start Day – Select the starting day of payroll from the dropdown. All 7 days are available, but you’re only able to select 1 day.
- Default Payroll Process – Select the cadence of the default payroll processing (Daily, Weekly, or Daily/Weekly).
- Minimum Age – Enter the Age (years) and the number limit of Hours – both mandatory. Enter the values, or use ▲ / ▼ to increase/decrease the values by 1.
- Break-In/Break-Out Terminal - Select from the dropdown the terminal where Employees will log their Break activity.
- Weekly clock-in/out details in clock-out print - If enabled (YES), the weekly clock-in and clock-out details will be included on a clock-out print.
- Click Save. The ‘Payroll Settings Updated Successfully’ confirmation banner appears.
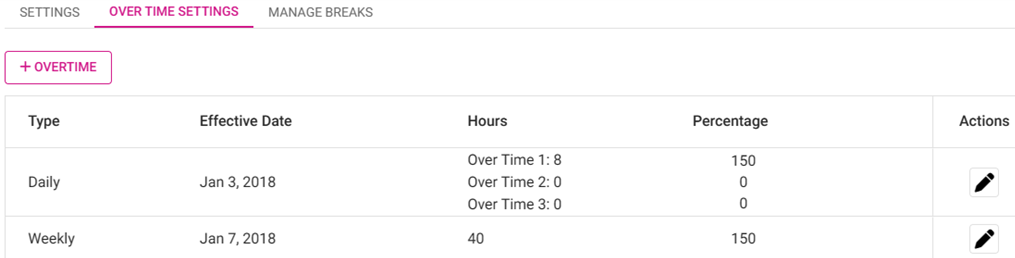
Over Time Settings
The + OVERTIME button appears along with a table that has columns for an Overtime’s Type, Effective Date, Hours, Percentage and Actions (with an Edit [pencil] button).
- Click + Overtime. The New Over Time pane appears.
- On the New Over Time pane, set the selection for the Overtime (Daily or Weekly).
Daily | Weekly |
|
|
Edit  :
:
- If Edit is clicked, the field cannot be edited if it has passed the Effective Date. A pop up appears with Okay and Cancel options, both of which close the window.
- If it has not passed the Effective Date, the details can be edited.
- Note: Based on the details filled in the payroll report settings, the report will function accordingly.
Manage Breaks
On the Manage Breaks tab, the + NEW BREAK button appears along with a table that has columns for a Break’s Effective Date, Name, Payroll Type, Duration, and Actions (with a Delete [trash can] button).
Create a Break
- Click + New Break. The New Break pane appears.
- Select the Break Name from the dropdown.
- Enter the Duration (Minutes) – Type the value or use ▲/▼ to increase/decrease the value by 1 (maximum of 100). Only numbers are allowed.
- Select the Effective Date (calendar view).
- Payroll Type – Select Paid or Unpaid.
- Select what to Apply To:
- All Employees – All employees will be selected.
- Specific Roles – Select one or more Roles or Select all. Click a selected box again to deselect it.
- Specific Employees – Select one or more Employees or Select All. Click a selected box again to deselect it.
- When the new Break details are set, click Save. You are returned to the main Payroll Report screen under the Manage Breaks tab. The banner ‘Break Settings Saved Successfully’ appears along with the newly-added Break.
- Click Cancel to cancel creating the new Break and return to same page and tab.
Delete a Break
- Identify the Break to delete, then under the Actions column click the Delete (trash can).
- On the Delete pop-up appears, click Delete to confirm deleting the Break.
- Click Cancel or X Close to keep the listed Break.
- You are returned to the Payroll Report page under the Manage Breaks tab, where the Break has been removed and the ‘Break Settings Deleted Successfully’ confirmation appears at the upper-right.
Related Articles
Retail Back Office: Employee Reports
Navigation: Sign into the Back Office and select a Retail Store, then select Reports > Employee The Employee Reports page displays a comprehensive set of data on the activity of the Store's employees, with tabs for the following: Attendance Role ...Retail Back Office: Enterprise - Reports
Navigation: Sign into the Back Office. On the left-side Navigation Panel, click Enterprise. Select Enterprise Reports, and the dropdown contains options to access specific reporting Dashboards: Enterprise Reports Sale Report The Sale Report dashboard ...Back Office: Payroll Report Settings
Sign into the Back Office. On the left-side Navigation Panel, click Settings. On the Settings page, under Reports click Payroll Report. On the Payroll Report page, 3 tabs appear: Settings, Overtime Settings, and Manage Breaks. Settings Over Time ...Retail Back Office: Matrix Report Inventory Settings
Navigation: Sign into the Back Office for your Retail Store. Click Settings, then on the Settings page under Inventory select Matrix Report Settings. On the Matrix Report screen: Profit Threshold Amount – (Mandatory) Enter the threshold value Amount ...Retail Back Office: Sales Recap Report Settings
Navigation: Sign into the Back Office for your Retail Store. On the left-side Navigation Panel, click Settings. On the Settings page, under Reports click Sales Recap Report. The Sales Recap Report page contains the following sections: General ...