Retail POS: Price Level Settings and Display Groups
Back Office
Price Level Settings
Navigation: Log in Back Office for your Retail Store, then select Products/Items > Product/Items
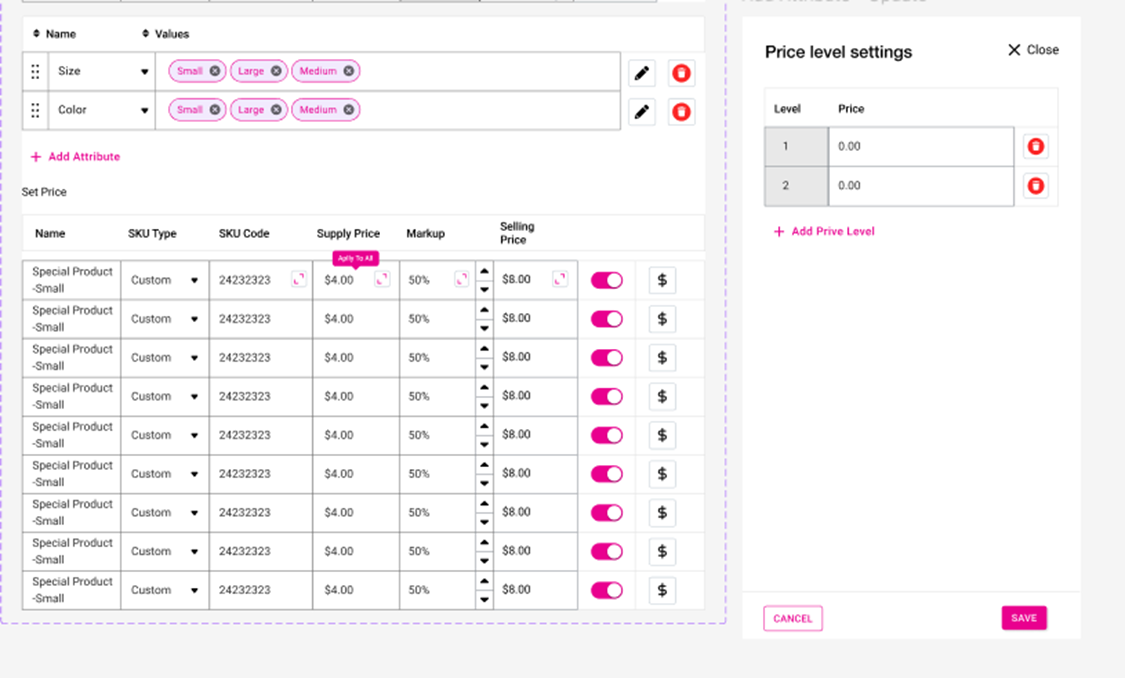
On the Retail Item creation screen, the dollar sign ($) button to the right of the Selling Price is available for Price Level Settings. Clicking the button, you can add a Price Level for the particular Retail Item. Price Level Settings applies to Standard Item, Item with Variant and Scale Items.

Example: Item with Variants
Notes
- The Selling Price entered for the item will be prepopulated at Price Level 1 and it will be grayed out and the Delete (trash can) button won't appear.
- Any changes in selling price will be reflected in Price Level 1.
- Up to 10 price levels can be added.
- After a decimal it will be 2 digits and before the decimal it will be up to 9 digits.
- Example: 123,456,789.12
Display Group
Navigation: Log in Back Office for your Retail Store, then select Products/Items > Display Group
For more information on Display Groups, see the Display Groups Knowledge Article.
- When creating a new Display Group, you can select the price level in the Price Level field (already configured in retail item screen, if any).
- Kit Items and Open Items don't apply to price level. It will be visible in the dropdown but the price level won't apply.
Retail POS
Upon setting the Price Level for a Display Group in BO, the selected Price Level will appear for Retail Items. When the Item is selected from a Display Group, the price level selected for display group in BO will appear.
For a Standard Item: if the items are placed from the display group category it will appear on a separate line and if placed from Category it will appear on a separate line.
When the Item is selected from the Category, the price configured for the Retail Item will appear.
Related Articles
Retail Back Office: Products/Items - Display Groups
Navigate: Log into the Back Office for your Store, then select Products/Items > Display Group Display Groups give you the option to create and sell a predefined combination of Retail Items. The table displays the list of the saved Display Groups with ...Retail POS: Customer Display Hardware Settings
On the Hardware Settings screen, select the Card Reader tab. The screen displays the device name of the Customer Display which is connected to the POS. Back Office License Settings Navigation: Log into Enterprise, then select Settings. Under Licenses ...Retail POS: Dual Price Payments
Back Office Navigation: Log into BO, select a Store then select Settings > Payment Settings When enabling the Dual Price option, the Dual Price Disclaimer pop-up appears. Dual price calculations will be determined by the retail price. Dual pricing ...POS: Operation - Customer Display Hardware Settings
Back Office CDS Back Office Settings For more information, see the Back Office CDS Settings Knowledge Article. License Settings Navigation: Log into Enterprise, then select Licenses > License Settings To integrate CDS with the POS of a Store: the ...Retail POS: Membership Payments
Membership gives the ability to organize Customers into Loyal Customers. By using Membership Account, you will be able to organize and apply Tax exemptions to Members of the group, maintain the account balance, and issue allowances. Membership ...