Retail POS: Return (Refund, Refund All, Refund Items)
Return
Under the Closed tab of the Sale History screen: select a Receipt to perform a refund or exchange on, then click Return.
Refund
- For Sale, any replacement:
- Before Close Day will be considered as Void
- After Close Day will be considered as Refund
- For Auth, any replacement:
- Before Batch will be considered as Void
- After Batch will be considered as Refund
After Batch / After Close Day for Sale and Auth Payments
If a Retail Item isn't selected before Refund Items is clicked, the message 'Please select any retail item' appears.
If a newly add item is selected then Refund Items is clicked, the message 'Newly add item cannot be refunded' appears.
Refund All
To refund all Retail Items on the Receipt, click Refund All. The Refund screen appears.
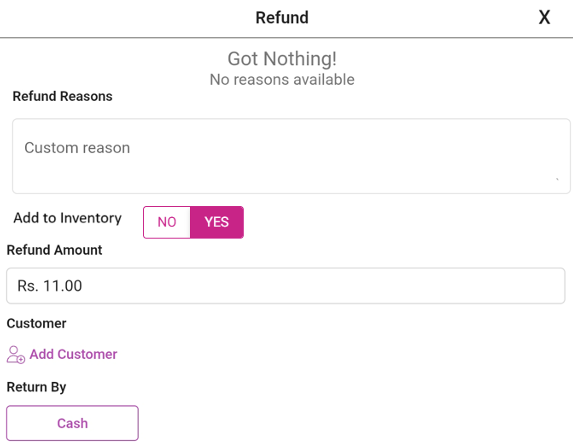
- Select a Refund Reason (mandatory) from the options configured in Back Office, and you can enter any Free Text for further justification.
- Select whether to Add the item to Inventory.
- For the Refund Amount, it defaults to the full value of the item (not editable).
- The Customer defaults to the original customer on the receipt with their original mode of payment and the amount paid.
- For Return By, the mode of payment used for the Receipt will displayed. If multiple payment modes are available, then all of them will appear. The Amount should be refunded to the source of the payment only.
- After the amount is refunded, the Refund Completed screen will appear which displays the Subtotal, Tax and Total.
- Print Receipt - If clicked, the receipt will be printed with store name, status, employee id, date and time - and the retail item value will appear as negative.
- Done - When clicked, you're redirected to the Order screen.
Refund Items
To refund particular Items on the Receipt, select the Refund Items option. The number of retail items selected will be displayed.
On the Refund screen that appears:
- Select a Refund Reason (mandatory) from the options configured in Back Office, and you can enter any Free Text for further justification.
- Select whether to Add the item to Inventory.
- For the Refund Amount, it defaults to the full value of the item (not editable).
- The Customer defaults to the original customer on the receipt with their original mode of payment and the amount paid.
- For Return By, the mode of payment used for the Receipt will displayed. If multiple payment modes are available, then all of them will appear. The Amount should be refunded to the source of the payment only.
- After the amount is refunded, the Refund Completed screen will appear which displays the Subtotal, Tax and Total.
- Print Receipt - If clicked, the receipt will be printed with store name, status, employee id, date and time - and the retail item value will appear as negative.
- Done - When clicked, you're redirected to the Refunded screen.
Note: Refund can be only processed once the batch is completed.
Partial Quantity Refund
To refund particular Items on a Receipt, use the Refund Items option.
- Under Retail items, the number of selected retail items will appear.
- Click Refund Items. The Refund Items - Select Refund Quantity pop-up appears, which displays the Item selected for refund along with the Quantity of the item.
- Single Item with Multiple Quantity
- Example: Nutrition Bar Dark Chocolate Almond Coconut with quantity of 3. Increase or decrease the quantity of item by using plus (+) or minus (-) option.
- Quantity cannot be 0 and cannot be increased more than the item quantity originally ordered.
- After selecting the quantity, click Continue and the Refund screen appears where you can still edit the quantity of the refund. To complete the refund, follow the above Refund process.
Multiple Item with Multiple Quantity
Follows the same process as Partial Quantity Refund, but with multiple items appearing on the Refund Items - Select Refund Quantity and Refund pop-ups.
Single Item with Single Quantity
Follows the standard Refund Items process when selecting a single item.
Sale History
- Original receipt AOO1 contains Bicycle with a quantity of 3 under the Closed tab. 2 bicycles are refunded using partial refund functionality.
- Based on this the new receipt A002 will be generated. The new receipt A002 will be under the Refunded tab with refunded quantity of 2.
- The original receipt A001 will be in Closed tab with 1 remaining quantity of the bicycle and in the original receipt when the receipt is reopened, in the order screen Bicycle with 1 quantity will be displayed along with the price the single quantity bicycle and the refund item will 2 quantities be displayed as separate line item along with – symbol and grayed out.
- So, for original receipt A001 and other Closed tab functionalities such as refund, exchange and reopen related functionalities will be applicable.
- The Refund receipt will appear only in the Refunded tab
Receipt Tax
| Item | % | Qty | Price |
| Retail 1 | 2 | 200 | |
| Receipt Tax | 10% | 20 | |
| Total | 220 |
A Receipt Tax of 10% is applied to the Receipt, and the Customer wants to refund 1 of the item:
- Under Refund Amount, the single item value will appear along with other details in POS.
- On the Digital Receipt screen, the Refund Receipt appears.
Receipt Discount - Percentage
If the receipt value is more than 99$ the 10% discount will be applied. 1 QTY price is $100 so 3 qty price will be $300 and 10% discount is applied for 3 items so the total price is $270.
| Item | Amount | Qty | Price |
| Retail 1 | 3 | 300 | |
| Discount | 10% | 30 | |
| Total | 270 |
- A Quantity of 2 is refunded. The new Receipt will be created and the Refund Amount is $180. On the Refund pop-up the price will be $180 on the newly-created Receipt.
- It will also appear on the Digital Receipt screen.
Receipt Discount - Amount
In this example: if the receipt value is more than $99, then the Receipt Discount amount of $10 will be applied.
The receipt value is $300 so the $10 discount will be applied. Value of the receipt will be $290.
| Item | Qty | Price |
| Retail 1 | 3 | $300 |
| Discount | -$10 | |
| Total | $290 |
- A quantity of 2 is refunded. The new receipt will be created so the refund amount will be $200.
- The price will be $200 on the Refund popup as well as on the newly created Receipt.
Notes
- After the refund process is complete, the refunded quantity will be added back to the inventory.
- Remaining functionality will work as-is.
- The order screen will update based on the refunded quantity change calculation.
Related Articles
Retail POS: Refunded Tab
After Performing Refund All or Refund Item: a new receipt will be generated, and the receipt under Refunded Tab The Parent Receipt will be available under Closed tab and any newly generated refund receipt in Refunded tab. If there is single item on ...Retail POS: Membership Payments
Membership gives the ability to organize Customers into Loyal Customers. By using Membership Account, you will be able to organize and apply Tax exemptions to Members of the group, maintain the account balance, and issue allowances. Membership ...Retail POS: Clover Payments
Configuration in Back Office Admin On the Admin page, enable the Clover Payment toggle (set to YES). Configuration in Back Office Navigation: Select Settings > Payment > Payment Method Payment Method When creating a new Payment Method (or updating an ...Retail POS: MPPG Payments
Configuration in Admin Select Account > Stores, then select the Store for which the respective Payment needs to be enabled. Under the Store Settings section, enable the MPPG toggle. When you enable the MPPG credit card toggle, the MPPG details appear ...Retail POS: Dual Price Payments
Back Office Navigation: Log into BO, select a Store then select Settings > Payment Settings When enabling the Dual Price option, the Dual Price Disclaimer pop-up appears. Dual price calculations will be determined by the retail price. Dual pricing ...