POS: Custom Button
Back Office
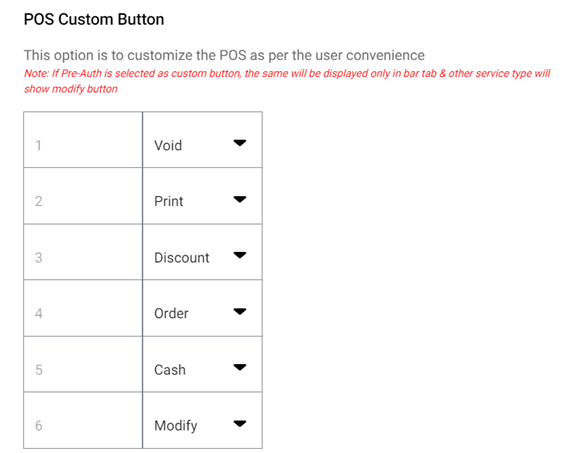
You can customize 6 fields as the Custom Buttons in POS, with drop down for all 6 options. The dropdown options are:
- Discount
- Order
- Search
- Print
- Cash
- Modify
- Void
- Credit Card
- Gift Card
- URL
- URL will only appear when POS URL is configured in the settings
- Pre - Auth
- The selected options from the Application Settings from Back Office will reflect in the POS Order screen.
- The following options will be shown in the Back Office settings – Void, Discount, Order, Search, Print, Cash, and Modify
- Check, Payment, and Log Off – The mentioned three options are standard in POS. The remaining 6 options can be configured in the Back Office settings
- The following options will be the Default selections: 1 Void, 2 Print, 3 Discount, 4 Order, 5 Cash, and 6 Modify.
When Pre Auth is enabled, the Pre Auth field can be selected as one of the 6 fields in POS Custom URL. The following message will appear:
- Note: If Pre-Auth is selected as custom button, the same will be displayed only in bar tab and other service type will show modify button.
When we set Pre Auth as a POS Custom Button and when we disable Pre Auth, the Pre Auth selected as default will be changed to Modify and Pre Auth won't be shown on the dropdown.
POS
The selected options will appear on the Order screen of the POS, based on the POS Custom Button selection in the Back Office.

- When the option Custom Button Action is chosen as Search, then only the Search option will be displayed.
- You will be able to search Menu Items.
 - This is a custom option
- When the option POS Custom Button Action is chosen as Discounts, then only the Discount option will be displayed.
- You will be able to apply Discount(s) to the Check.
 - Send the ordered Menu Item(s) to the Kitchen
Related Articles
POS: Check Options - Custom URL
Back Office See the POS Custom URL article in Back Office. For Custom Buttons, see the General Application Settings article in Back Office. POS After the toggle is enabled in Back Office, with the URL and Image(s) configured: URL Check Option On the ...Retail POS: Receipt Options - POS Custom URL
Back Office See the POS Custom URL article in Back Office. For Custom Buttons, see the General Application Settings article in Back Office. POS After the toggle is enabled in Back Office, with the URL and Image(s) configured: URL Receipt Option On ...Back Office: POS Custom URL Application Settings
Sign into the Back Office and select a Store. On the left-side Navigation Panel, click Settings. On the Settings page, under Application click POS Custom URLs. POS Access URL – Toggle to Enabled (YES [Default]) to add URL Links (up to 10 can be ...Retail Back Office: POS Custom URL Application Settings
Navigation: Sign into the Back Office for your Retail Store. On the left-side Navigation Panel, click Settings. On the Settings page, under Application click POS Custom URLs POS Access URL – Toggle to Enabled (YES [Default]) to add URL Links (up to ...POS: Fast Cash Payments
Note: Only Employees with the proper Role and Permission settings have access to make payment through Cash. Back Office Under Settings > General Settings, the POS Custom Button option is available. This is to customize the POS per your Store's needs, ...