POS: Wait List
Back Office Settings
Wait List Add On
Navigation: Log into Staging Revamp. Select Enterprise > Settings > Account License Settings
When the Wait List toggle is enabled for a Store, only that Store will have a Wait List add-on.
Wait List
Navigation: Log into BO, then for your Store select Settings > Application > Wait List.
- On the Wait List screen, select the Wait List tab (should be selected by default).
- On the Wait List tab, select + Wait List. The New Wait List pane appears.
- Min Seats - (Mandatory) Enter the minimum number of Seats required for this Wait List. Type in the value and/or press the upwards/downwards triangles to increase/decrease the value.
- Max Seats - (Mandatory) Enter the maximum number of Seats allowed for this Wait List. Type in the value and/or press the upwards/downwards triangles to increase/decrease the value.
The Max Seats value must be greater than the Min Seats value. - Occupied Time Hours - (Mandatory) Select the maximum amount of Hours of occupied time. The dropdown options max out at 10.
- Occupied Time Minutes- (Mandatory) Select the maximum amount of Minutes of occupied time in addition to the Hours. The dropdown options max out at 55 in intervals of 5.
- When ready to create the Wait List, click Save at the bottom-right. You are returned to the Wait List tab and the 'Wait List Added Successfully' confirmation banner appears at the upper-right.
- Click Cancel to cancel the creation of the Wait List.
Reasons
Navigation: Log into BO, then for your Store select Settings > Application > Wait List.
- On the Wait List screen, select the Reasons tab.
- On the Reasons tab, select + New Reason. The New Reason pane appears.
- Enter the Reason that a Party can be added to a Wait List. Mandatory field and maximum of 25 characters.
- When satisfied with the Reason entered, click Save. The button won't be available until a Reason is entered.
- When a Reason is successfully created and saved: you are returned to the Reason tab on the Wait List settings page, and the confirmation banner 'Wait List Reason Added Successfully' appears at the top-right.
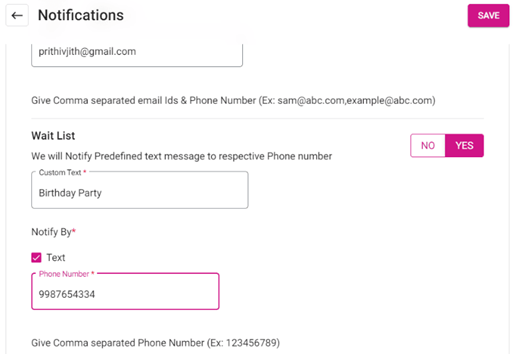
Notifications
Navigation: Log into Back Office. For your Store, select Setting > Store > Notification
When the Wait List toggle is enabled (set to YES), you can send a predefined Custom Text to registered phone number or email. Enter the Custom Text in the box to be sent as the notification. The Notify By option will appear with Text checkbox, then enter the 9-digit Phone Number as a single string of numbers.
POS
Enabling the Wait List Feature
When the license for the Wait List add-on has been purchased: Under POS Settings, the Enable Wait List toggle will be disabled by default. Enable the toggle, and you will be able to use the Wait List feature in POS. This applies to Dine In service only.
Wait List Screen
Select the Wait List tab, and the Wait List screen appears.

- Waiting Customer: Displays the total count of waiting customers.
- Parties Waiting: Displays the total number of Parties currently waiting.
- Available Seats: Displays the total count of available seats.
- Average Wait Time: Displays the Sum of Waiting minutes on the table divided by the Sum of Customers on the table.
Adding a Party to the Wait List
To add a new Party:
- On the Wait List screen: tap on the plus (+)
icon at the bottom-right. The Add Party screen appears.
- Search for an existing Customer by entering their Name or Phone Number in the Search box. When selecting any one of the existing Customers from the Search box, the Name and Phone Number of the selected Customer will appear on the screen.
- Size – There will be options for selecting the number of children, adults and senior citizens.
- Children -
- If Children are included in a Party: then on the main Wait List screen the Size column will display the number of Children in brackets.
- Adults -
- Seniors -
- Status – Different color to assign to parties on the Wait List.
- The Notes dropdown displays the Reason(s) created for the Store in BO. You can click the keypad icon next to the field to manually enter a Note.
- When ready, click Next.
- Select the Type:
- Wait Time - Select the Wait Time from the dropdown.
- ETA - If the Expected Time of Arrival toggle is enabled, you can select the date and time. This is for capturing when the Customer will be arriving to dine.
- When the Type is set: press Add at the bottom-right of the Add Party window. You are returned to the Wait List screen where the newly-created Party has been added as a line item.
Assign a Wait List Party to a Table
- Click the corresponding Assign button under the Actions column for a Customer.
- When a Customer is assigned a table: the respective Customer will be removed from the Wait List screen.
Notify a Customer
On the Wait List screen:
- Click the corresponding yellow icon under the Notify column for a Customer.
- The confirmation message 'Do you want to notify customer via SMS?' appears, with Yes and No options.
- If Yes is selected: an SMS will be sent to the Customer. The content of the SMS is derived from the Custom Text set in BO.
- If No, the SMS will not be sent.
- Once the SMS is sent to the Customer: on clicking the icon, the Phone Number of the Customer will appear. The message is sent to the Customer's Phone Number.
Edit a Wait List Party
On the Wait List screen:
- Click the corresponding three dots (...) button under the Actions column for a Customer, then click Edit.
- The confirmation message 'Do you want to edit the guest record?' appears, with Yes and No options.
- If Yes is selected: the Add Party pop-up appears. You can edit the Size, Status, Notes, and Timings. You cannot edit the Name and Phone Number.
- If No, the message will be closed and the user will be retained on the Wait List screen with all current settings.
Cancel a Wait List Party
- Click the corresponding three dots (...) button under the Actions column for a Customer, then click Cancel.
- The confirmation message 'Do you want to cancel the booking?' appears, with Yes and No options.
- If Yes is selected: the SMS message ‘Your reservation has been cancelled.’ will be sent to the Customer assigned to the Party.
- If No, the message will be closed and the user will be retained on the Wait List screen.
Offline Mode
When the Wait List toggle is enabled, the below offline functionality will work.
- Offline mode is compatible with the Wait List feature.
- When the Point Of Sale (POS) is in offline mode, the Wait List feature will still function. You can still add a Wait List and customers in the wait list table will appear. Once a table is assigned, the system will remove the Customer from the Wait List and the edit option will also work.
- At last line, each screen displays this pop-up message: 'This POS has not received the latest changes and seems to be offline please check your internet connectivity.'
Related Articles
POS: Operation - POS Settings
POS Settings Navigation: Log into POS, then select Operation > POS Settings Note: Only Employees with the proper Role and Permission settings have access to POS Settings. Till Settings This section is used to define the behavior of Till Management. ...POS: Notification Settings
These Settings are intended for receiving notification for these events. Back Office Navigation: Log into Staging Revamp, select a Store, then select Settings > Store > Notification Notifications Settings Page The Notifications Settings page contains ...Back Office: Wait List Application Settings
With an Enterprise Account: sign into the Back Office and select a Store. If you are a non-Enterprise Level user, you will be taken directly to the Home screen. On the left-side Navigation Panel, click Settings. On the Settings page, under ...POS: Operation - 86 List
Navigation: In POS, on the Operation screen select 86 List. The 86 List screen displays the Menu Item configured in Back Office along with the corresponding maximum number of times it can be placed within an Order, and that quantity can't be exceeded ...Retail Back Office: Marketing - Manage List
Navigation: Sign into the Back Office for your Retail Store, then select Marketing > Manage List. The Manage List screen contains a table of created marketing Lists, with the following columns, based on selections made when creating each List: Name – ...