POS: Operation - POS Settings
POS Settings
Navigation: Log into POS, then select Operation > POS Settings
Note: Only Employees with the proper Role and Permission settings have access to POS Settings.
Till Settings
This section is used to define the behavior of Till Management. This section will have the following options:
- Enable employees to set Till - When user enable the option Enable employees to set Till and tap on the Save Changes, the option Till in the Till Management will be enabled. Else, the option Till in the Till Management will be disabled.
- Set default Till as Global - When user enable the option Set default Till as Global and tap on the Save Changes, the option Global Till in the Open Till pop up will be displayed in enable mode by default. user can be able to disable the ‘Global Till’ option in the ‘Open Till’ pop up later. By enabling the option Set Till on clock in, the employee will be prompted with the Open Till pop-up when clocked in. User can enter the Default starting cash only when the option ‘set till on clock in’ is enabled. This option is used to set the opening balance in the Till.
- Enable Cash Drop - This option is used to set the Cash drop limit. User can enable the option Enable Cash Drop and give the value for First Cash Drop Limit and Second Cash Drop Limit and tap on the Save Changes. Now when user make payment during the sale through Cash beyond the limit, a message saying “Cash amount has exceeded the limit. Please make a drop now” will be displayed on the Payment screen.
- Vexen Payment - User can provide the Till No of the Vexen Payment device.
- Default Gift Card Type - This option is used to set the default Card Type in the Check Options pop-up on the Order screen.
- It has two options – Gift Card (default) and Factor 4 Card. When modifying the option to Factor 4, then it will appear as default on the Check Options screen.
- Note: The Give X Payment feature is not implemented in version 6.0, but it is available in the native iOS version.
- Enable Order Type - This section is used to define the behavior of the Order screen.
- Dine In - This option is used to set the default floor that employee needs to take the Order (disabled by default). When enabled, you can set the floor in the Default Layout pop-up.
- Ask seat count in Table layout - On enabling the option Ask seat count in table layout, user will be prompted with the Customer Count pop up while creating a new check or sale.
- Ask Customer Name - When enabled, the Customer Name pop-up appears while creating a new Check or Sale.
- Order Type - This option is used to enable the various types of orders in the Order Type pop up. The following options are available:
- For here – The customer will order the menu items in the restaurant and will have the same in the restaurant itself.
- To go – The customer will order the menu items in the restaurant and will take those items in the parcel.
- Delivery – The customer will order the menu items in the restaurant and will ask the servers to get the items delivered in the customer’s location.
- Phone to go - The customer will order the menu items by phone and will take those items in the parcel.
- Phone delivery – The customer will order the menu items by phone and will ask the servers to get the items delivered in the customer’s location.
- Web Order – This option is used for denoting whether the restaurant is open or not while creating an online order by the Customer.
Overwrite CC Setting
Back Office
Navigation: Log into the BO for your Store then select Settings > Receipt Printer. Under the Settings tab.
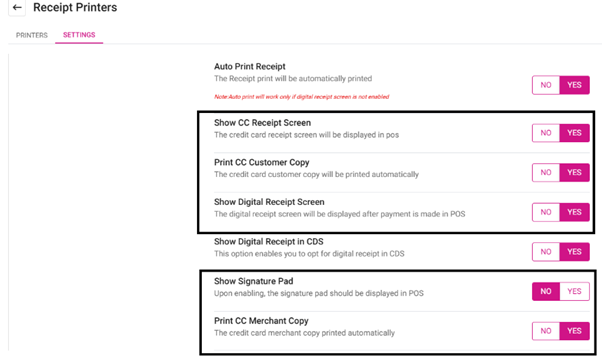
- Show Digital Receipt Screen – When the toggle is set to YES, then after payment is made in POS and it will display only when the Auto Print Receipt toggle is enabled. When set to NO, the digital receipt screen will not be displayed after payment, regardless of whether the Auto Print Receipt toggle is enabled.
- Show Signature Pad – When the toggle is set to YES, then signature pad will be displayed, and customer should sign in the appropriate space provided. When set to NO, the signature pad will not be displayed, and the customer will not be prompted to sign.
- Show CC Receipt Screen – When the toggle is set to YES, the credit card receipt screen will be displayed in POS. When set to NO, the credit card receipt screen will not be displayed in the POS system.
- Print CC Merchant Copy – When the toggle is set to YES, the credit card merchant copy will be printed automatically. When set to NO, the credit card merchant copy will not be printed automatically.
- Print CC Customer Copy – When the toggle is set to YES, then it will be printed automatically. When set to NO, the credit card customer copy will not be printed automatically.
- Navigation: Log into the BO for your Store, then select Settings > Application > General Settings
- When the Prompt Tip Screen Before Credit Card Screen option is set to YES, the system will prompt to add a tip before the credit card payment screen.
- When set to NO, the system will not prompt to add a tip before the credit card payment screen.
POS
By default, the Overwrite CC Setting option will be disabled, but it can be enabled later.
When Overwrite CC settings is enabled in any iPad, the Back Office settings will not be applied in the respective iPad.
- When Enabled, you will be able to enable and disable the remaining toggle.
- When Disabled, you won't able to access the remaining toggles.
The various available options are: Show Digital Receipt screen, Show Signature Pad, Show CC Receipt screen, Print CC Merchant Copy, Print CC Customer Copy, and Prompt Tip screen before the Credit Card screen.
When the option Overwrite CC settings is disabled in the iPad, the Back Office settings will be applied in the respective iPad.
Overwrite CC setting has many features to enable receipt prints like Show digital receipt screen, show signature pad, show CC receipt screen, Print CC merchant copy, print CC customer copy, and Prompt Tip Screen before credit card screen.
Note: If the BO toggle is disabled but enabled on the POS screen, it means the toggle is working based on the POS settings only and will not function according to the BO condition.
- Print Future Order – User can print future orders only when this option is enabled.
- Required Phone Number for To Go and For Here Order – When this option is enabled, the below option Ask customer name if phone number is not required will get disabled. On enabling the option Required phone number for For Here Order, user will be navigated to the Customer Profile screen while creating a new check or sale.
- Ask Customer Name – On enabling the option Ask Customer Name, user will be prompted with the Customer Name pop up while creating a new check or sale.
- Bar Tab – When this option is enabled, the Bar Tab will get displayed in POS operation screen. On enabling the option Bar Tab, user can be able to create new Bar checks immediately after tapping on the Finish option on the Order screen.
- Quick Bar – On enabling the option Quick bar, user can be able to create new Bar checks immediately after tapping on the Finish option on the Order screen.
- Ask Customer Name – On enabling the option Add Customer Name, user will be prompted with Customer Name pop-up while creating a new Bar Tab check.
- QSR – By default, this option will be in disabled mode. On enabling the option QSR, user can be able to create new checks immediately after tapping on the Finish option on the Order screen.
- Enable Wait List – This option enables the wait list feature in the POS system. When disabled, the wait list feature will be disabled in the POS system.
- Enable Caller ID – This option is used to enable the Caller ID feature in the POS. When user have bought the license for Caller ID add-on, then only user can be able to enable the option Enable Caller ID. On enabling the option Enable Caller ID, you will be allowed to provide the Port Number. After providing valid Port Number, you will be able to use the Caller ID feature in the POS.
- Offline Mode – When a user enabled this option, the application will work as-in process i.e., offline action. When any actions are carried out offline, then those actions will be stored locally (when any sale is carried out then that sale will be stored locally and when the system comes back online then these actions will be posted in the server). When a user disabled this option, the application will require an internet connection and will not function offline.
- Allow Offline Payment – When user enabled this option, allows payments to be accepted without internet; transaction sync when connection is restored. When user disabled this option, payments require internet; transactions cannot proceed offline.
- Theme Switcher – This section used to configure the color options in the POS UI. Dark Theme- There will be four options for theme – Linga, Aqua Blue, emerald and Safron. Light Theme. There will be three options for theme - Aqua Blue, Emerald, Safron. User can choose any one of the themes. When user select any one of the themes and restart the application, the selected theme will be applied to all the screens in the POS.
- Use Clover Settings – Clover print or POS print that can be configured.
Save Changes
Selecting Save Changes in POS Settings will apply and stores the updated configurations immediately. A 'Successfully Updated the POS Settings' pop up message will appear.
Related Articles
Retail POS: Operation - POS Settings
Navigation: Log into POS, then select Operation > POS Settings Note: Only Employees with the proper Role and Permission settings have access to POS Settings. Till Settings This section is used to define the behavior of Till Management. Back Office ...POS: Operation - Printer Hardware Settings
Back Office For more information on Printer and Receipt Template settings, see the following Knowledge Articles: Receipt Printers Kitchen Printers Kitchen Receipt Template POS On the Hardware Settings page, select the Printer Settings tab. It ...POS: Operation - Scale Hardware Settings
Back Office See the Receipt Printer Knowledge Article. Connecting the Printer to the Scale On the Scale: connect the DB9 male side of the cable to the highlighted port. Connect the port supply to the highlighted port. Connect the scale cable to the ...Retail POS: Operation - Support
In POS, select Operation then Support. The Support Operation screen appears. It is broken down by the Download and Status tabs. Download Tab The latest version of the POS is available for download via the Download button. If you click the Download ...Retail POS: Operation - Batch
In POS, select Operation then Batch. User Dropdown The User dropdown contains a list of users (employees), allowing you to choose a specific User from the list. Once a User is selected, you can view a list of transactions carried out by that selected ...