Retail Back Office: Enterprise - Memberships
Navigation: Log into Back Office. Select Enterprise then under Customers select Memberships.

The Memberships page contains 3 tabs:
Type
Plan
Account
Type
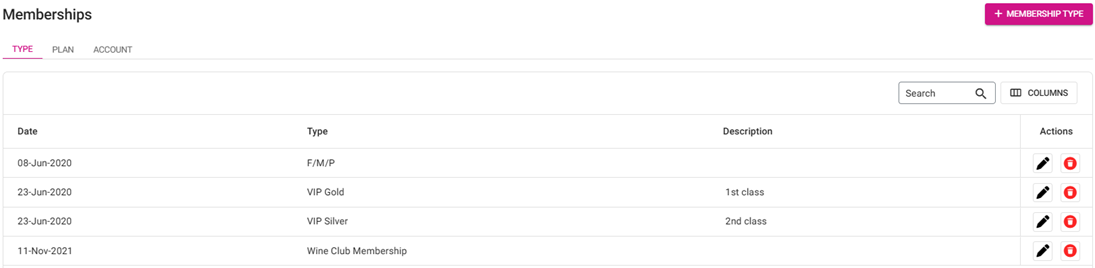
The Type tab contains the list of membership types in table format – with columns for Date, Type, Description and the Actions column with options to Edit and Delete. Also, the + Membership Type button appears at the upper-right.
Creating or Updating a Membership Type
- Click + Membership Type at the upper-right (or to update: under Actions, click the corresponding Edit (pencil).
- The New/Update Membership Type pane appears - with fields for Type, Price Level and Description.
- Enter the values for each field:
- Type – (Mandatory) Enter the type’s name. It must be unique and no greater than 25 characters.
- Description – Enter any needed additional details for this Membership Type. No character limit.
- Price Level – (Mandatory) Select one option from the list of 10 levels, or Default.
- When you’re satisfied with the values entered in the fields, click Save. You’re returned to the main Memberships page under the Type tab and the confirmation banner appears at the upper-right.
Deleting a Membership Type
- Under Actions, click the corresponding trash can button for a type’s row.
- On the Delete pop-up that appears: select Delete to confirm deleting the Type.
- Selecting X Close / Cancel keeps the Type.
- You are returned to the Memberships page under the Type tab, and the deleted Type has been removed from the table.
Plan
The Plan tab contains the list of membership types in table format – with columns for Date, Name, Type, Tax Exemption, Allowance, Allowance Period and the Action column with options for Edit and Delete. Also, the + Membership Plan button appears at the upper-right.
Creating a New Membership Plan
- Click the + Membership Plan button at the upper-right. The New Membership Plan pane appears:
- Name – (Mandatory) Enter the name of the Plan, with a limit of 25 characters.
- Type – (Mandatory) Select the Type of plan (from the list of entered and saved Types) from the dropdown.
- New Types can be created from the Type tab.
- Allowance – Enter the value for the new membership plan. Numbers only allowed.
- Allowance Period – Select a period from the dropdown.
- Monthly – The membership plan’s allowance period will be monthly and the allowance amount will be charged monthly.
- Quarterly – The membership plan’s allowance period will be quarterly and the allowance amount will be charged quarterly.
- Half-Yearly – The membership plan’s allowance period will be for 6 months and the allowance amount will be charged every 6 months.
- Yearly – (Default) The membership plan’s allowance period will be yearly and the allowance amount will be charged for a year. It’s set automatically in application settings.
- Allowance Overdraft – The additional or extra amount more than the allowance amount can be used for the respective membership plan. Only numbers can be entered and no limits of digits in this field.
- Tax Exemption – If enabled (set to YES), the tax exemption will be included for the membership plan. If disabled, there will be no tax exemption.
- For Applicable Stores, select the Stores that this Plan can apply to (or Select All). If more than 10 stores are selected, the message '[number] items selected' appears at the dropdown header.
- When ready, click Save at the bottom-right. You are returned to the Memberships page under the Plan tab, where the new Plan is added and the confirmation banner appears at the upper-right.
- The Save button will be disabled (greyed out) until all mandatory fields are filled-in.
Deleting a Membership Plan
- Under Actions, click the corresponding trash can button for a Plan's row.
- On the Delete pop-up that appears: select Delete to confirm deleting the Plan.
- Selecting X Close / Cancel keeps the Plan.
- You are returned to the Memberships page under the Type tab. The deleted Plan has been removed from the table and the confirmation message appears at the upper-right.
Account
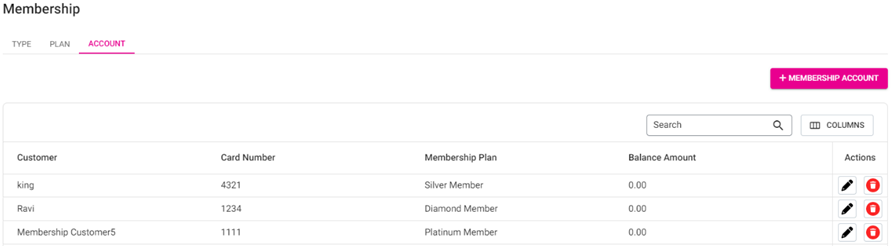
The Account tab displays a table of Customers with a Membership account on file, with columns for Customer, Card Number, Membership Plan, Balance Account, and Actions for Edit (pencil) and Delete (trash can). Also, the + Membership Account button appears at the upper-right.
Creating or Updating a Customer Account
- Click the + Membership Account button at the upper-right (or the corresponding pencil under Actions). The New/Update Membership Account pane appears.
- Customer – (Mandatory) Select from the list of existing Customers in the dropdown.
- Membership Plan – (Mandatory) Select from the list of added Plans (under the Plan tab) in the dropdown.
- Card Number – Enter the membership account’s card number. Letters and numbers are allowed, but it cannot exceed 25 characters nor be identical to an existing Card Number.
- Description – Enter any needed additional information for the new Account.
- Issue Date – Select the date the Account will be issued (calendar view).
- Expiry Date – The date will auto-populate based on the Membership Plan selection, and can't be edited.
- Examples: If it's a monthly plan, the Expiry Date will populate as the ending date of the same month as the Issue Date. If it's a yearly plan, the Expiry Date will populate as the laste of the same year as the Issue Date.
- Balance Amount – The balance amount based on the selected Membership Plan, and cannot be edited.
- Add Members – (Mandatory) Select one or more members from the dropdown.
- Note: If the customer already has a membership account within the store, a new account can’t be created and the following alert message appears: ‘Add member [Member Name] already has a membership account in store level’ and the window will close.
- After filling in all mandatory fields and all other needed fields, click Save at the bottom-right of the pane. You're returned to the Memberships page under the Account tab, where the new Account is added and the confirmation message appears at the upper-right.
Deleting a Membership Account
- Under Actions, click the corresponding trash can button for an Account's row.
- On the Delete pop-up that appears: select Delete to confirm deleting the Plan.
- Selecting X Close / Cancel keeps the Plan.
- You are returned to the Memberships page under the Account tab. The deleted Account has been removed from the table and the confirmation message appears at the upper-right.
Related Articles
Retail POS: Membership Payments
Membership gives the ability to organize Customers into Loyal Customers. By using Membership Account, you will be able to organize and apply Tax exemptions to Members of the group, maintain the account balance, and issue allowances. Membership ...Retail Back Office: Enterprise Stores
Navigation: Sign into the Back Office for your Retail Store. On the left-side Navigation Panel, click Stores. The Stores page appears, with each tile representing a Store under your Enterprise. Click on a Store's tile to access its Back Office. Note: ...Retail Back Office: Enterprise - Reports
Navigation: Sign into the Back Office. On the left-side Navigation Panel, click Enterprise. Select Enterprise Reports, and the dropdown contains options to access specific reporting Dashboards: Enterprise Reports Sale Report The Sale Report dashboard ...Retail Back Office: Enterprise - Customers
Navigation: Sign into the Back Office. On the left-side Navigation Panel, select Enterprise then Customers. When selected, the existing Customers’ details will be shown as a table with the following columns: Image, Name, E-Mail, Phone Number, Loyalty ...Retail Back Office: Enterprise Dashboard
Navigation: Sign into the Back Office. On the left-side Navigation Panel, click Enterprise. For a moment, your data will load while the banner ‘Please wait while preparing your enterprise metrics’ appears. Then, the Enterprise page is populated. On ...