Retail Back Office: Messaging Scheduler
Navigation: Log into Back Office for your Retail Store, then select Scheduler > Messaging
Messaging enables Staff to communicate with each other.
The Messaging screen is broken down by tabs for Inbox and Sent Items.
Inbox
Sent Items
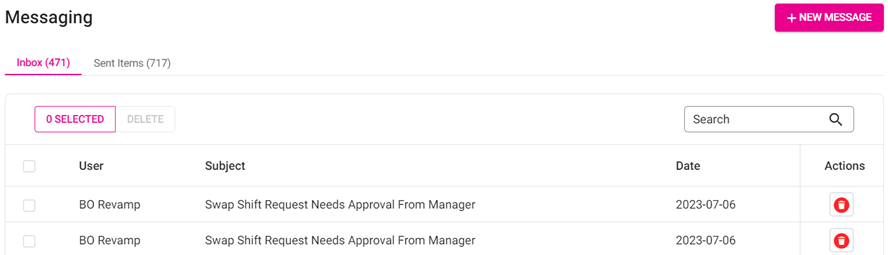
Inbox
Displays all received messages. Contains the following columns:
- User – The sender of the message.
- Subject – The Subject Line of the message.
- Date – The Date the message was sent [YYYY-MM-DD].
- Actions – Click the trash can icon to delete the message. The Delete pop-up appears. Select Delete to delete the message, or Cancel / X Close to keep it.
- Select a message to open it. The Read Message pane appears, with an option to Reply – or Close / Cancel.
- Click Reply to enter a reply. A cursor appears below the Notes where you type the reply.
- Click X Close or Cancel to close the pane without entering a reply.
- When ready, click Send. You are returned to the main Messages screen where the ‘Email Sent Successfully’ confirmation banner appears.
- To create a new message, click + New Message at the upper-right. The New Message pane appears.
- Add Subject – Enter the Subject line of the email message (below the Send button).
- To – Begin typing the first name of the employee(s) who you’d like to receive the message, then select the name when it appears. Selected employees will appear highlighted in pink on the To: line. Select them again to de-select them (removes pink highlight).
Notes: - You must type the first name. Typing the individual’s last name will cause them not to appear as a result.
- There must be at least one selected Employee in the To: line for the message to successfully send.
- Below the Subject and To: lines, enter the body of the message.
- When ready to send the message, click Send.
Sent Items
Displays all sent messages. Contains the following columns:
- User – The receiver of the message.
- Subject – The subject line of the message.
- Date – The date the message was sent [YYYY-MM-DD].
- Actions – Click the trash can icon to delete the message. The Delete pop-up appears. Select Delete to delete the message, or Cancel / X Close to keep it.
- Select a message to open it. The Read Message pane appears, with an option to X Close / Cancel. This example shows the reply to the previous message. Reply messages will default with Re : to start the Subject line.
Related Articles
Retail Back Office: Requests Scheduler
Managers (Admin level) can approve requests for Time Off or Shift Swapping. Employees can approve Shift Swapping requests from their co-workers. Navigation: Log into Back Office for your Retail Store, then select Scheduler then Requests The Requests ...Retail Back Office: Introduction to Scheduler and Adding It To Your Account
Introduction to Schedules As a component of the Cloud POS software ecosystem, Schedules is a web-based software created for helping restaurant’s manage the Shifts of their staff. Integrated with the Back Office application, restaurants are now able ...Retail Back Office: Dashboard - Schedules
Navigation: Log into the BO for your Store, then on the Home page Dashboard select Schedules You can view all the Schedules for the current week: Scheduled Hours It will show total hours scheduled for an Employee. Schedule Est. Wages It will shows ...Back Office: Messaging Scheduler
Messaging enables staff to communicate with each other. Log into Back Office then select a Store. On the left-side navigation screen, select Scheduler then Messaging. The Messaging screen is broken down by tabs for Inbox and Sent Items. a Inbox Sent ...Retail Back Office: Scheduler
Shift Management can be performed on the Scheduler screen. Navigation: Log into Back Office for your Retail Store, then select Scheduler > Scheduler The Scheduler screen displays the following details and information: Note: The Scheduler screen ...