Retail Back Office: Products/Items - Subcategory
Navigate: Log into BO for your Store then select Products/Items > Subcategory
Create a New Subcategory / Update an Existing Subcategory
- Create a new Subcategory by clicking + New Subcategory.
- Or update an existing Subcategory by clicking the corresponding pencil icon under the Actions column.
- When clicked, the New/Update Subcategory page appears.
General
- General – POS Display Button
- Set a POS Display Button for the Subcategory to display as:
- Standard Color
- Click the small colorized square (next to the larger colorized square).
- Select the color by using the 2 sliders.
- Upload New Image
- Click the icon of the
document with the upwards facing arrow. A File Explorer pop-up window appears.
- Navigate to where your Display Button image is saved, then select the file and click Open or just double-click it.
- File Format – JPG or PNG
- File Size – Maximum of 2 MB
- Resolution – Recommended 400px by 400px
- General – Name
- Set the Name (Mandatory) – the name will appear as a caption for the Display Button. Maximum of 25 characters.
- General – Category
- Select the Category from the dropdown (Mandatory, established under Products/Items > Categories). To find an Category more easily, begin typing the name of it in the Search field. For more information on Categories, see the Categories article.
- With the Category selected, select the Unit of Measure and whether to Apply a Default Unit of Measure (if selectable and not defaulted).
Tare Group
- Select a Tare Group from the dropdown. For a large number of Tare Groups, you can type in the Search bar to find the needed Tare Group more quickly. To create a new Tare Group, click the + New Tare Group button. For more information on Tare Groups, see the Tare Group article.
- With the Tare Group selected, select the Default Tare.
Tax
- Select existing Taxes that apply to this Subcategory (the button will turn pink), then click them again to deselect (returns to white). If there are a large number of Taxes you can click Show All, then Hide to hide the additional listed Taxes.
- Create a new Tax by clicking + New Tax. For more information on Taxes, see the Taxes article.
- The Inherit Default Tax toggle is enabled by default and being enabled is mandatory.
Availability
You can select the Availability of this Subcategory. This Subcategory will appear in Sales channels based on the Time Period selection:
Always
If Always is chosen, this will be available all days and times.
Days of Week
Days of Week
- Select Days - Select the Day(s) the Category will be available in POS (you can select more than one day).
- Restriction Time / Available Time - Both Available Time and Restriction Time can be set here by enabling the toggles (setting to YES).
- Set the Restriction Time by selecting the Start and End Times (clock view) then click OK.
- For an Available Time, set the Start and End Times for the Category to appear in the POS (clock view).
- You can Add an Available Time period by clicking + Add New Time and a new time period row appears to select another Start and End Times.
- Note: A Time cannot fall under both Restriction and Available (there cannot be overlap between the Restriction Time and an Available Time).
Days of Month
Days of Month
If Days of Month is selected:
- Select the appropriate Dates.
- If you enable the Available Months (set the toggle to YES), select the Months the Category will appear in POS.
- Restriction Time / Available Time - Both Available Time and Restriction Time can be set here by enabling the toggles (setting to YES).
- Set the Restriction Time by selecting the Start and End Times (clock view) then click OK.
- For an Available Time, set the Start and End Times for the Category to appear in the POS (clock view).
- You can Add an Available Time period by clicking + Add New Time and a new time period row appears to select another Start and End Times.
Note: A Time cannot fall under both Restriction and Available (there cannot be overlap between the Restriction Time and an Available Time).
Date Range
Date Range
If Date Range is selected:
- Select the Start and End Dates (calendar view).
- Restriction Days / Available Days - Both Available Days and Restriction Days can be set here by enabling the toggles (setting to YES).
- Restriction Time / Available Time - Both Available Time and Restriction Time can be set here by enabling the toggles (setting to YES).
- Set the Restriction Time by selecting the Start and End Times (clock view) then click OK.
- For an Available Time, set the Start and End Times for the Category to appear in the POS (clock view).
- You can Add an Available Time period by clicking + Add New Time and a new time period row appears to select another Start and End Times.
Note: A Time cannot fall under both Restriction and Available (there cannot be overlap between the Restriction Time and an Available Time).
Specific Date
Specific Date
If Specific Date is selected:
- Select the single Date the Category will be available in POS (calendar view).
- Restriction Time / Available Time - Both Available Time and Restriction Time can be set here by enabling the toggles (setting to YES).
- Set the Restriction Time by selecting the Start and End Times (clock view) then click OK.
- For an Available Time, set the Start and End Times for the Category to appear in the POS (clock view).
- You can Add an Available Time period by clicking + Add New Time and a new time period row appears to select another Start and End Times.
Note: A Time cannot fall under both Restriction and Available (there cannot be overlap between the Restriction Time and an Available Time).
Date Range with Time
Date Range with Time
If Date Range with Time is selected:
- Select the Start and End Dates (calendar view).
- Restriction Time / Available Time - Both Available Time and Restriction Time can be set here.
- For an Available Time, set the Start and End Times for the Category to appear in the POS (clock view).
- You can Add an Available Time period by clicking + Add New Time and a new row appears to select another Start and End Times.
- Set the Restriction Time by enabling the toggle, then selecting the Start and End Times (clock view) then click OK.
Note: A Time cannot fall under both Restriction and Available (there cannot be overlap between the Restriction Time and an Available Time).
Visibility
- Hide in POS - Set the toggle to YES to enable it and have the Subcategory appear in POS. It will be disabled (NO) by default.
- Conversational - Set the toggle to YES to enable it and have the Subcategory appear in Conversational view in POS. It will be disabled (NO) by default.
- Enable Age Restriction - Set the toggle to YES to enable it and have the Subcategory be restricted by age, along with any Sub-Categories under this Subcategory. It will be disabled (NO) by default which means anyone of any age can purchase items from this Subcategory. If an item does not meet the Age Verification in POS, it will be voided and added to the Void Report.
- Exclude Receipt Tax - Set the toggle to YES to enable it and have the Subcategory be excluded from a Receipt Tax. It will be disabled (NO) by default. If the toggle is changed from NO to YES (or vice versa) and the Subcategory has Subcategories underneath it, a Reminder pop-up appears confirming that applying the change apply to all those Subcategories., with Okay and Cancel / X Close options. If Okay is clicked, the toggle change is applied. If Cancel / X Close is clicked, the toggle remains unchanged.
Label Printers
- The Inherit Default Label Printer Settings toggle will be available. If enabled, all the Label Printers mapped for the Subcategory will be selected.
- You can select/de-select Label Printers for this Subcategory. Selected printers are in pink and de-selected in white. If there are a large number of Label Printers, click Show All to reveal all options. Click Hide to reduce the view of options.
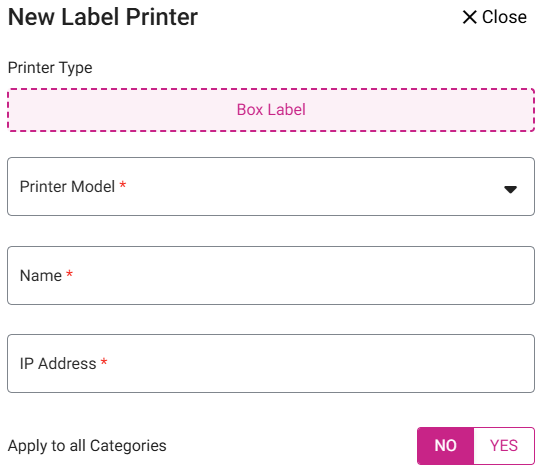
Create a New Label Printer
You can create a new Label Printer by clicking the + New Label Printer button. The New Label Printer pane appears. For more information on creating a Label Printer, see the Label Printer article.
Save/Update and Publish
- Click Save to create the new Subcategory (or Update on the existing Subcategory). The new Subcategory will be saved or updated. You are returned to the main Subcategories page with a confirmation appearing in the upper right corner.
- To push the updates to the POS, click the Publish (red button with upwards arrow and horizontal line) button at the top-right corner.
- The button will turn green and the message 'Publishing started' appears.
- Once complete, the message 'Store data published successfully' appears.
Delete a Subcategory
- Identify the Subcategory to be deleted. Then under the Actions column click the corresponding Delete (trash can icon) button.
- The Delete pop-up appears, which contains the message 'Are you sure you want to delete this item' along with Cancel and Delete options.
- Click Delete. If the Subcategory does not have any connected Items, it will be deactivated and the confirmation message appears.
- Click Cancel or X Close to close the pop-up and keep the Subcategory as active.
- If the Subcategory has attached Items, the message 'The Subcategory is attached in retail items. Could no inactivate.' appears and the Subcategory remains.
Related Articles
Retail Back Office: Products/Items - Bulk Update
Navigation: Log into the Back Office for your Store, then select Products/Items > Bulk Update The Bulk Update page displays all the Categories/Subcategories and Retail Items created under Products/Items in table view. When no Retail Item has been ...Retail Back Office: Products/Items - Upcharges
Navigation: Log into the Back Office for your Store, then select Products/Items > Upcharges The Upcharges page displays a table containing the Name of each Upcharge under the Store, along with Actions to Edit or Delete. To Delete an Upcharge: click ...Retail Back Office: Products/Items - Discounts (Item-Based)
Navigation: Log into the Back Office of your Retail Store, then select Products/Items > Discounts. On the Discounts page, select the Item Based tab. It displays a table with the current Item-Based Discounts with the columns Name, whether it has a ...POS: Retail Items
Back Office For a Restaurant: only Standard Retail Items can be created in the BO. Log into Back Office, select a Store, then select Products/Items > Products/Items. On the Products/Items page, click + NEW RETAIL ITEM at the upper-right. Note: POS ...Retail POS: Operation - Print Labels
Setting Up a Label Printer Back Office Before printing labels in POS, you must first have Label Printers configured in Back Office. Navigation: Log into the Back Office for your Retail Store. Select Settings. Then under Hardware, select Label ...