Retail POS: Multi Currency Payments
Back Office
Payment Methods
Navigation: Log into BO and select a Store, then select Settings > Payment Methods
When creating a new Payment Method (or updating an existing one):
- The Payment Type must be set to Cash for the Multi Currency payment options to be selected.
- Select the Currency from the dropdown.
- Enter the Exchange rate.
- Both Currency and Exchange are mandatory fields for the multi-currency to be saved.
Till Management
Navigation: Log into BO and select a Store, then select Settings >Till Settings
On the Till Settings page, select the Denominations tab
POS
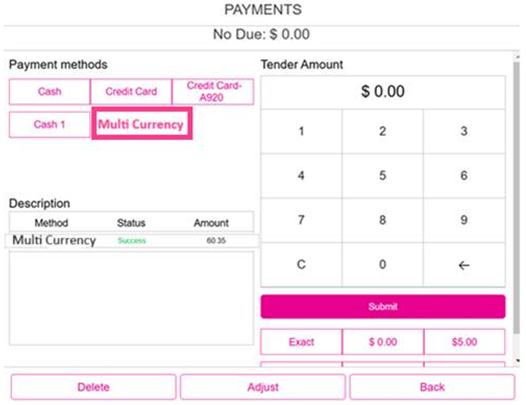
Multi Currency will be one of the Payment Methods to compete the Sale.
- Select Multi Currency, and the Cash pop-up appears
- The equivalent entered in Back Office will appear at the top-right (Above Example: 1$ = DA 1.50000).
- The Total, Balance, and Store Currency equivalents appear.
- Remaining functionality will be similar to other Cash payments.
- The list of multicurrency options created as Payment Methods appear.
- The Name marked for the multi cash payment in BO settings will appear on the Multi Cash page.
- The currency symbol set for the respective Currency will appear before the Multi Currency name configured in BO. (DA Multi from the above example).
- The currency will appear in the Total field, Total option, and Balance amount.
- Enter the value then press Enter.
- If the paid multi-currency value is more than the Check, the remaining Change Due will appear in POS.
- If the paid multi-currency value is less than the Check, then the remaining balance can be paid using the same multi cash or with another payment method.
- Partial pay is applicable for multi-currency payments.
Re Opening Closed Check Using Multi Currency
Multi Currency payment can be deleted.
Partial Payment Using Multi Currency Payments
Refunds
Refund
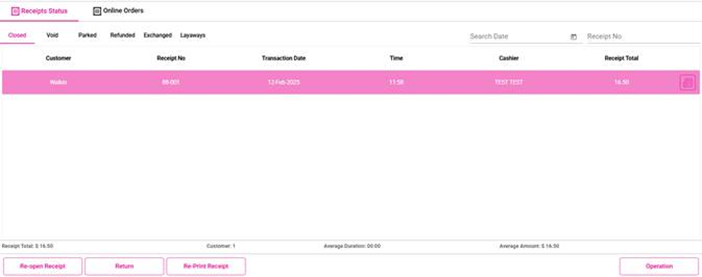
A sale is placed and close day performed. You can refund the paid amount of the Receipt by selecting Refund. Select the Receipt which has to be refunded, and you must select a Refund option on the Sale History screen. Receipt will be opened on the Order screen and there will be two options Refund Items and All.
Refund Retail Items
Select the Receipt then the Refund option. The Refund will be initiated only for selected Retail items.
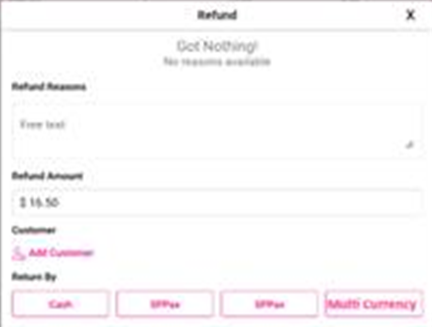
Refund Receipt
- Select the payment type then provide Reason for the Refund. Amount to be refunded will be displayed. The Refund will be initiated for the full Receipt.
- Amount will be refunded to the original payment source only. The multi currency name configured in BO will appears, the same as other payments.
- After the amount is refunded, Refund completed screen will appear which displays the Amount refunded with Subtotal, Tax and Total.
Print Receipt
The receipt will be printed with store name, status, employee id, date and time and Retail Item value will be shown in negative.
Done
You will be redirected to the Order screen.
Layaway and Exchange will apply to Multi Currency.
Exchange
For an Exchange scenario: when choosing multicurrency, the Cash pop-up will appear. You can pay only the exact amount on the Receipt.
- If attempting a different amount, the message 'Please pay (amount of the receipt) to proceed' appears.
Till Management
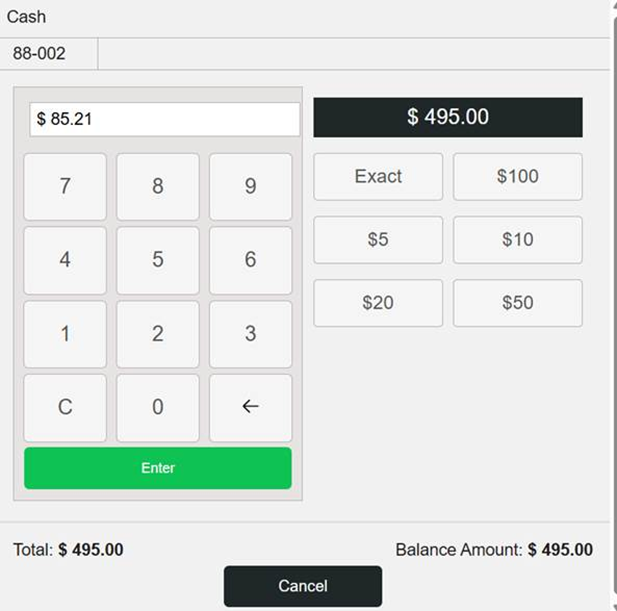
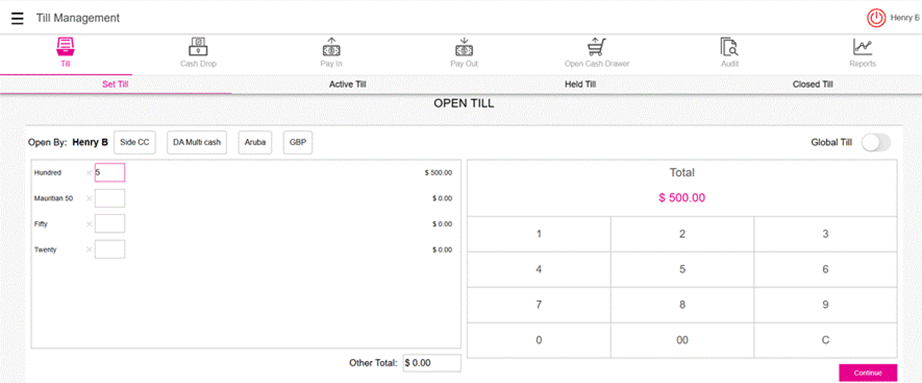
Open Till
- When the Till is being opened in POS, the denominations added under the Till Settings will appear .
- Upon entering the numerical value in the number pad screen, the denomination marked in Back Office will appear in the Open Till page.
- From the above example: if the denomination marked is $100 in BO and the value entered is 5, the total Value will be $500 on the Till page in POS
Adjust Till
For adjusting the till Multi Currency, the Denomination will appear.
The Adjust Till will also display the same Multi Cash options in POS.
Close Till
- The till Multi Cash denomination will appear.
- Different Multi Cash payment methods from setting up Open Till will appear next to the Employee Name.
- The denominations created in Till settings will appear in the Open Till.
- Beside the payment name, the currency symbol of the multi currency should be shown in POS. ( Mauiritian rupee beside DA).
- As the user selects the multi currency value, The multi currency value entered should be shown in the Open till section and the equivalent store currency value should be shown in the Till section.
- From the above example: the Mauritian Rupee entered in Open Till is DA 500.00 and the Store currency equivalent will be $50.00. (Exchange value set in BO is 10.0000).
- Within the Other Total field, the Multi Cash value will appear. (refer to the below example)
- When switching to Multi Cash options on the Till screen, the denominations will be removed.
- Close Till also will have the Multi Cash options.
Receipts
Front End Receipt
- The Cash (example: DA 110.00) will appear below the Total.
- The store currency equivalent will appear in the receipts.
- Multi Currency tendered line item will appear on the receipt as well. It will display the net actual Multi Currency paid. (example: DA 110.00)
Void Receipt
- When the payment is deleted, the Void receipt will have the Paid By line item as Multi Currency, where the amount voided will appear.
Partial Payment Receipt
- The Multi Currency tendered line item will appear below the partial payment.
- The Partial Cash paid will appear on the front-end receipt.
- The Net Cash tendered will appear on the receipt.
- Only the store currency values will appear on the receipt.
- Note: The same impacts regular Multi Currency will appear on Reprint as well.
- Note: The Payment Name created in the BO settings will appear on receipts ('Multi Currency' is not a static text).
Email Receipt
- Cash Tendered should field the Multi Currency symbol used to close the check. (DA 121.80)
- The Multi Currency name should be shown in the receipt above the Cash tendered field. (Mauritian rupee $12.18
Report Impacts
- The Multi Currency paid checks will be shown in all the reports similar to the Cash payments.
- Refund reports will include Multi Currency payment method for refunds.
Weekly Summary Report
- Under payments the Multi Currency payment details should be shown.
- CASH REFUNDS should include Multi Currency refunds as well.
Transaction Report
- Tender type it should be the Multi Currency tender name.
- Within check details it should be the Multi Currency type.
Refund Report
- Payment Name column will display Multi Currency when Multi Currency payments are used for refund.
Sale Summary Report
- The Multi Currency type will appear within Check Details
Related Articles
Retail Back Office: Payment Method Settings
Navigation: Sign into the Back Office for your Retail Store. On the left-side Navigation Panel, click Settings. On the Settings page, under Payments click Payment Method. The Payment Method page displays a table of Payment Methods that were created ...POS: Multi Cash Payments
This applies to native iPad ONLY. Back Office Payment Methods Navigation: Log into BO and select a Store, then select Settings > Payment Methods When creating a new Payment Method (or updating an existing one): The Payment Type must be set to Cash ...Retail POS: MPPG Payments
Configuration in Admin Select Account > Stores, then select the Store for which the respective Payment needs to be enabled. Under the Store Settings section, enable the MPPG toggle. When you enable the MPPG credit card toggle, the MPPG details appear ...Retail POS: Membership Payments
Membership gives the ability to organize Customers into Loyal Customers. By using Membership Account, you will be able to organize and apply Tax exemptions to Members of the group, maintain the account balance, and issue allowances. Membership ...Retail POS: Clover Payments
Configuration in Back Office Admin On the Admin page, enable the Clover Payment toggle (set to YES). Configuration in Back Office Navigation: Select Settings > Payment > Payment Method Payment Method When creating a new Payment Method (or updating an ...