POS: Bar Tab - Overview
A Bar Tab is a convenience for both Bartenders and their Customers. By opening a Tab, it allows you to order a Drink while not having to perform a Transaction for each Drink. This helps everyone by saving time - and frees up the Bartender to perform Transactions easier and make Drinks faster.
Back Office
Adjusting a Role's Permissions
Navigation: Log into BO, and for your Store select User Management > Roles
On the Roles page:
- When creating a new Role (or updating an existing Role), select the POS dropdown section.
- Note the two toggles Open All Checks and View All Check Status.
- Enable the Open All Checks toggle by selecting its corresponding checkbox. When enabled, then the selected Role will have access to open any Employee's Checks under Check Status, Table Layout and Bar Tab.
- If disabled, the Role will not be able to open other employees' Checks.
- Enable the View All Check Status toggle by selecting its corresponding checkbox. When enabled, then the selected Role will have access to view all other Employees Checks under Check Status, Table Layout and Bar Tab.
- If disabled, the Role will not be able to view other employees' Checks.
Scenarios
Examples of a Role's Access:
- The Open All Checks toggle and View All Check Status toggle are both enabled: Employees logged in as the Role can view and open all Checks on all screens.
- The Open All Checks toggle and View All Check Status toggles are both disabled: Employees logged in as the Role can view only their particular Checks in the Check Status, Table Layout and Bar Tab screens.
- The Open All Checks toggle is enabled and View All Check Status toggle is disabled: Employees logged in as the Role can only view their own checks in the Check Status, Table Layout and Bar Tab screens.
- The Open All Checks toggle is disabled and View All Check Status toggle is enabled: Employees logged in as the Role can view all Checks in the Check Status, Table Layout and Bar Tab screens - but they will not be able to open the Checks, and attempting to will cause the 'You don't have permission to open this check' alert to appear.
- Note: The Phone/Web Orders screen will work with existing functionality.
POS
When the Bar Tab option is selected, the BarTab screen appears:
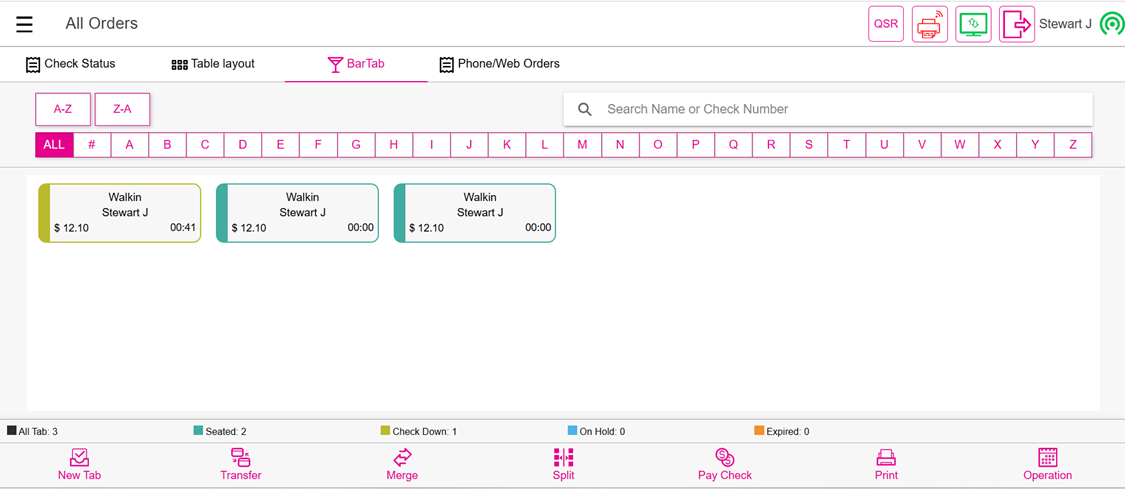
You can search for a Check by providing the Customer’s Name or Check Number in the Search box. You can change the display order using the A-Z and Z-A buttons. As well as use the individual letters to sort orders by first letter of the Order Name. Note: The default Order Name is Walkin. You can change this on the Order by adding a customer profile to the order or tapping on Walkin at the top of the Order to use the Quick Name option.
Bar Tab Order Statuses
The Order Status color of a bar tab is indicated by the colored line around the Order and the thicker line on the left of the border. The key for the color statuses is located at the bottom of the screen.
- All Tab - The key count displays the total number of orders on the Bar Tab.
- Seated - The key count displays the number of orders in the Seated status. This status is an active order that has not had a customer receipt printed, have any items on hold from the kitchen and has not expired.
- Check Down - The key count displays the number of checks in the Check Down status. This status indicates that the customer receipt has been printed for the check.
- On Hold - The key count displays the number of checks that are in the Hold status. This status indicates that there is at least one item on an Order that was marked as Hold and not sent to any kitchen printers or displays.
- Expired - The key count displays the number of checks that are in the Expired status. A check will expire when it is active longer than the Table Expiration Time set in the back office (see the Table Expiration article).
Order Display
A Bar Tab will display the following:
- Order Name - Added by either adding a Customer Profile to the Order or using the Quick Name. The default name is Walkin.
- Server Name
- Order Total
- Order Elapsed Time - How long since the order was started [HH:MM]
Bottom Navigation
- New Tab - To start a new Check, click New Tab.
- Transfer - Used for transferring Orders from one Server to another, and transferring an Item from one Order to another.
- Merge - Used for merging 2 or more Checks into one Check.
- Split - Used for moving Items on one Seat to multiple Seats (Split by Seat) or dividing one check into multiple checks (Split by Check). Users can also use this option to split a single item and add each division to specific seats/orders.
- Pay Check - Used for opening the Order right to the Payment screen.
- Print - Used for printing the customer receipt without opening the Order.
- Operation - Opens the Operations dropdown.
Miscellaneous Actions
- To start an Order that will not be a Bar Tab (such as ToGo): click on the QSR button at the top-right of the screen.
- To log off the current user: click the exit button to the right of the user's name at the top-right of the screen.
Related Articles
POS: Phone / Web Orders - Overview
Navigation Navigating to the Phone/Web Orders Tab Delivery From the Log In screen, click the Delivery button. Enter your PIN then click Continue. The Phone/Web Orders screen appears on the New tab with the Delivery filter enabled. Phone Order From ...POS: Bar Tab - Floating Tab
To use a Bar Tab for a purpose other than at a Bar, the Floating Tab setting in the Back Office can be used to change the name of the Tab and the Order Type in the POS. Back Office Navigation: Log into BO, then for your Store select Settings > ...POS: Bar Tab - New Tab
This option is to create a new Check for the Bar Tab service type. When you tap on the New Tab option, the Order screen appears. Pre Auth If the Pre-Auth setting is enabled in the Back Office (Settings > General Settings): upon starting a new Bar Tab ...POS: Bar Tab - Split
This option is used to split the Check for different Seats. When the Split option is selected on the Bar Tab screen, you will be taken to the Split Check screen. For more information on Splitting Checks, see the Split Checks Knowledge Article.POS: Bar Tab - Restrict View
Back Office Navigation: Log into BO, and for your Store select User Management > Roles On the Roles page: When creating a new Role (or updating an existing Role), select the POS dropdown section. Note the two toggles Open All Checks and View All ...