POS: Phone / Web Orders - Overview
Navigation
Navigating to the Phone/Web Orders Tab
Delivery
- From the Log In screen, click the Delivery button.
- Enter your PIN then click Continue.
- The Phone/Web Orders screen appears on the New tab with the Delivery filter enabled.
Phone Order
- From the Log In screen, click the Phone Order button.
- Enter your PIN then click Continue.
- The Phone/Web Orders screen appears on the New tab.
All
- From the Order screen, click the All button.
- The Phone/Web Orders screen appears on the New tab.
- If the All button is selected with Items on an Order: the Order will automatically be saved and Items printed to the Kitchen.
- Order Types that appear on the Phone/Web Orders tab are For Here, To Go, Delivery and Web Orders. QSR, Bar Tab and Dine In (Table Layout) Orders will not appear on this tab.
- There are 4 tabs on the Phone/Web Orders tab: New, Out, Complete and Future.
Navigating Back to the Order Screen
- Click the hamburger icon (three horizontal lines) at the top-left then select POS from the dropdown.
- Click the QSR button at the top-right.
- Click the Add button at the bottom-left corner.
Logging Off
To log off a user, click the Exit button (door icon with right-facing arrow) at the top-right corner, next to the user's name.
Navigate to Operations Menu
- Click the hamburger icon (three horizontal lines) to open the Operations menu.
- Click the Operations button at the bottom-right corner.
Searching for Orders
You can Search for an Order by selecting one of the following options from the dropdown:
- Customer Name – Search by the Name of the Customer on the Order - only letters are allowed.
- Customer Phone – Search by the Phone Number of the Customer on the Order - only numbers and special characters (such as a hyphen [-]) are allowed.
- Customer Address – Search by the Address of the Customer on the Order - letters, numbers and special characters allowed.
- Check# - Search by a Check Number on the Order - only numbers and special characters (such as a hyphen [-]) are allowed.
- Zone – Search by the Zone for a Delivery Order - letters and numbers are allowed.
Live Map Search
- You can also search for and select Orders via the Live Map. The live map will display programmed zones and dots for delivery orders. The store icon in the middle is the restaurant. There is a color key for the dots in the bottom left of the map.
- There are no restrictions or minimums on the search box. Searches will show results that match order number, customer name and delivery address. Clicking on the order from the search box dropdown will open the order pane on the left side.
- Clicking on the eye next to the search box will open filter options for the dots that display on the map. Unchecking a filter will remove those dots from the map.
- Unassigned – Delivery orders that do not yet have a driver assigned.
- Assigned – Delivery orders that have a driver assigned but they've not yet departed.
- Delivering – Delivery orders assigned to a driver that has been departed.
- Delivered – Completed delivery orders.
- The dots on the map can be clicked to open the Order Details panel. If more than one dot is selected, each will show in the Order Details panel. Clicking on a selected dot again will remove it from the Order Details panel. If no dots are selected, the Order Details panel will disappear from the map. Selected dots will show larger on the map than unselected ones.
- The map can be moved around, swiped (up, down, left or right).
- To zoom in: use 2 fingers and pinch together on the screen.
- To zoom out: use 2 fingers and spread apart on the screen.
Order Panel
A selected Order will display the following:
- Check Number
- Total
- Paid/Unpaid
- Delivery Address
- Customer Phone Number
- Driver
- If a Driver is assigned: it will show the Driver's Name
- If no Driver is assigned: it will show UNASSIGNED
- Click on the receipt icon next to the Order Details to see the items and modifiers on the Order, Subtotal, Delivery Charge, Tax, Discount, Tip, Total and Payment Method (if applicable).
- The Active Driver panel shows below any selected orders and functions as it does on the New, Out and Future tabs.
Order Details Columns
- Check #: The unique identifier for the Order/Check Number.
- Customer Name: The Name of the Customer who placed the Order.
- Total: The Total amount of the Order.
- Payment Status: Indicates whether an order is Paid or Unpaid, allowing tracking of completed or pending payments.
- Type: Indicates the Order Type - For Here, Store To Go, Phone To Go, Web To Go, Store Delivery, Phone Delivery, or Web Delivery
- Zone: Identifies the delivery area or region assigned to an Order, helping organize deliveries efficiently.
- Delivery Address: Specifies the customer’s location where the Order needs to be delivered. Only the partial address appears on the screen. Tap on the Address to see a pop-up of the full Address.
- Phone: Displays the customer's Contact Number for communication regarding the Order.
- Recv (Received) Time: The Time the Order was received. [HH:MM] - only displays in 24 hr time measurement - commonly referred to as military time).
- Order No: The unique identifier for tracking and managing each Order.
- Driver: The Name of the Driver assigned to the Order.
- Driver Status: Indicates the assigned Driver's current Status - Standby or Delivering. Available only to those using the Driver app.
- Order Progress: Indicates the ETA (Estimated Time of Arrival) in HH:MM AM/PM format. Available only to those using the Driver app.
Sorting
The Sorting option  will apply to all Columns and will be handled for each Column (A-Z, Z-A).
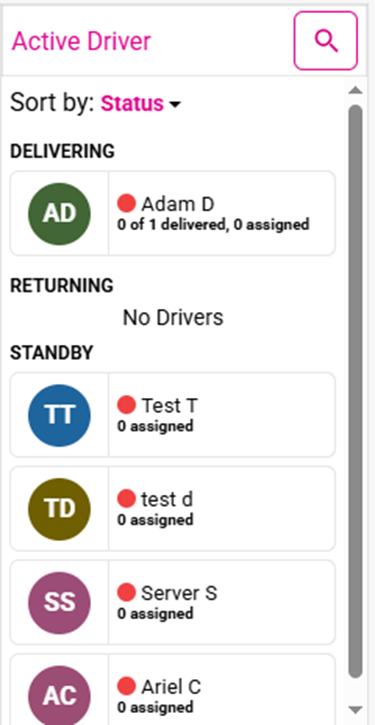
Active Driver
The Active Driver pane is available on the New, Out, and Future tab as well as the Live Map when an Order is selected.
Users
Only users assigned the Driver Role or a role with the Is Driver setting enabled under Roles will show in this section
- User Icon – Will display the user’s initials by default. If there is a picture saved to the user, the picture will display.
- User Name – First Name and Last initial.
- Assigned – Number of orders currently assigned to driver that have not been departed.
- Delivered – Number of delivery orders that have been delivered and closed of number of orders that have been departed for delivery.
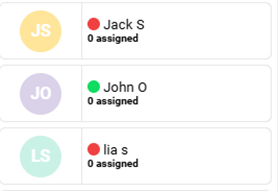
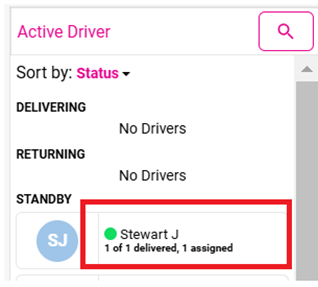
- User Status – Active (clocked in) drivers are marked with a
green circle, while Inactive (clocked out) drivers ready to take orders are marked with a
red circle.
- To remove inactive drivers from displaying, the Show Inactive Drivers toggle in the Back Office (Settings>Delivery>Driver) must be disabled (set to NO).
Driver Status Sections
- Delivering – Drivers that have been departed will show in this section
- Returning – For those using the Driver App, drivers that have left their last delivery address will show as returning.
- Standby – All drivers not that are not currently departed for a delivery.
Search
The search icon in the header will allow you to search for a driver. Only drivers matching results will show, or no drivers will show if there are no results. Results will change as the user continues to type in the search bar, narrowing the search results. Search results are only based on the drivers first name and first letter of their last name. Searching by a full last name will show no results. Click the x in the search bar to clear the search. Click the arrow in the search bar to exit the search bar and go back to the default view.
Sort
The sorting of the drivers can be changed by using the Sort By dropdown.
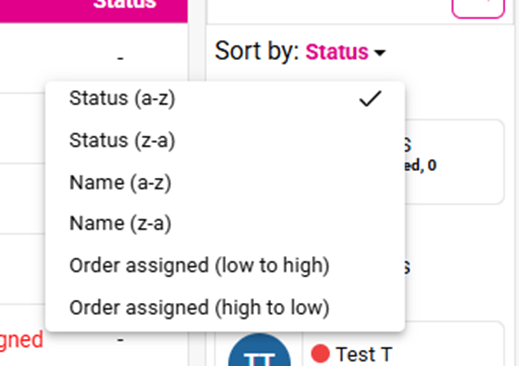
- Status (a-z) (default view): Sorts the driver’s statuses, Delivering, Returning, and Standby alphabetically
- Status (z-a): Sorts the driver’s statuses, Delivering, Returning, and Standby reverse alphabetically
- Name (a-z): Sorts all drivers names alphabetically. Removes the statuses from view when using this sort.
- Name (z-a): Sorts all drivers names reverse alphabetically. Removes the statuses from view when using this sort.
- Order Assigned (low-high): Sorts all drivers based on number of orders currently assigned from low to high. If drivers have the same numbers, they are then sorted by names alphabetically. Removes the statuses from view when using this sort.
- Order Assigned (high-low): Sorts all drivers based on number of orders currently assigned from high to low. If drivers have the same numbers, they are then sorted by names alphabetically. Removes the statuses from view when using this sort.
Driver Details
When you click on a Driver's image, a pop-up window displaying their details appears which contains the following information broken into sections by horizontal lines:
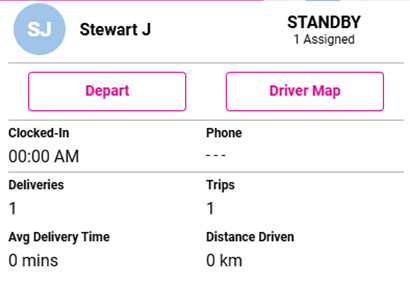
The top section displays the following:
- Driver Photo (if available - if not then first and last initials [SJ])
- Driver Name (Stewart J)
- Status of Driver (Standby)
- The number of Orders Assigned, and the amount delivered today
The second section displays the following:
Depart
- If the Driver has orders assigned to them, the Depart button will be pink and can be clicked to depart the Driver which moves the assigned Order(s) to the Out tab. If the Driver does not have Orders assigned to them the button will be greyed out.
Driver Map
- The Driver map is similar to the Live Map but displays only the Delivery Orders that are assigned to the Driver.
- The Trip Tracking and Assigned Orders tabs appear, along with the map of the selected Driver. Note: It will only show the Restaurant and Location of current Orders. If you're using the Driver app, the current location of the Driver will be available.
- Driver Photo (initials if not available)
- Driver Name
- Driver Status
- Number of Orders Delivered
- Number of Orders Currently Assigned
Trip Tracking Tab
- Displays a list of all the delivery orders assigned to the driver and departed
- Number Icon – The same number icon displays on the map
- Delivery address
- Check #
- ETA – Estimated time of arrival from the restaurant to the delivery address. This is based on when the driver is marked as departed and Google maps estimated time to drive to the address.
- Map Icon – Tap this icon to see the Google Maps directions from the restaurant to the delivery address
- Email Icon – Can email directions to the driver – An email address must already be on the employee’s user profile in the back office
- Print Icon – print the directions to the receipt printer assigned to the terminal
- Phone Icon – Text the directions to the driver – Alerts (texting) module must be active on the account and a phone number must already be on the employee’s user profile in the back office.
- Receipt Icon – Top this icon to see the order details:
- Items on the order with pricing
- Subtotal
- Delivery Charge
- Tax
- Discount
- Tip (if already applied)
- Total
- Payment Method
Assigned Orders Tab
- Displays a list of orders assigned to the driver, before departing
- Number Icon – The same number icon displays on the map
- Check #
- Total
- Paid/Unpaid
- Delivery address
- Customer’s Phone Number
- Map Icon – Tap this icon to see the Google Maps directions from the restaurant to the delivery address.
- Email Icon – Can email directions to the driver – An email address must already be on the employee’s user profile in the back office.
- Print Icon – Print the directions to the receipt printer assigned to the terminal.
- Phone Icon – Text the directions to the driver – Alerts (texting) module must be active on the account and a phone number must already be on the employee’s user profile in the back office.
- Receipt Icon – Tap this icon to see the order details
- Items on the order with pricing
- Subtotal
- Delivery Charge
- Tax
- Discount
- Tip (if already applied)
- Total
- Payment Method
Map
The map displays all delivery zones on the map as programmed in the back office. The restaurant is indicated by the pink store icon  . The driver’s orders are marked on the map by address. User can tap on the icons to see the Delivery address.
- Blue Icons (Assigned) – Orders that are assigned but not departed for the driver
- Green Icons (Delivering) – Orders that are assigned and departed for the driver
- Pink Icons (Delivered) – Orders assigned to the driver that have been arrived and closed. These orders will disappear from the map once a new trip has been departed for the driver.
Assigning Drivers
In this section, the username(s) of Employee(s) who have the Driver role (or role with Is Driver activated in Role settings) will appear. The following information is displayed below each Driver's name
- Select a Delivery Check (Store, Phone or Web) then select
- A Driver who is offline, the confirmation message 'Driver is offline. Still do you want to continue' appears. After confirming, the selected Driver will be assigned to the Check.
- A Driver who is online, the selected Driver will be assigned to the Check.
- Now, select the respective Driver then select Departure at the bottom of the screen.
- The check will be moved to the Out tab.
- Note: If the Assign Order to Departed Driver toggle is enabled in the Back Office: when a Check is assigned to a Driver, the respective Driver will appear in the Delivering section. This will also allow for the assigning of new orders even when the driver is out on a Delivery.
- If the toggle is disabled: when the Check is assigned, the Driver will not appear in the Active Driver section and you won't be able to assign another Check to that same Driver until the Orders in the Out tab have Arrived.
Columns
- Check #: The unique identifier for the Order/Check number.
- Customer Name: The Name of the Customer who placed the Order.
- Total: The Total amount of the Order.
- Payt. Status: Indicates of the order is Paid or Unpaid. Unpaid will display in Red.
- Type: Indicates the order type; For Here, Store To Go, Phone To Go, Web To Go, Store Delivery, Phone Delivery, or Web Delivery
- Zone: Identifies the Delivery area or region assigned to the Order - helping organize deliveries efficiently.
- Delivery Address: Specifies the customer’s location where the Order needs to be delivered. Only a partial address is show on the screen. Tap on the address to see the full address.
- Phone: Displays the customer's contact number for communication regarding their Order.
- Recv Time: The Time the Order was received. HH:MM - only displays in 24 hr time measurement (otherwise known in military time).
- Order No: The unique identifier for tracking and managing an Order.
- Driver: The Name of the Driver assigned to the Order
- Driver Status: Displays the assigned Drivers status; Standby or Delivering. If using Driver App, Returning will also be an option.
Bottom Bar Action Buttons
- Add: The Order screen appears and displays the Order Type pop-up, for creating a new Order.
- Edit: Select a Check then click Edit to edit the Order.
- Departure: After a Driver has been assigned to one or more orders, click the Driver and then click Departure. This will move the orders to the Out tab and the Driver to a Delivering status.
- Note: After selecting a Check and clicking Departure: the message 'Select any Driver' appears.
- Arrival: The Arrival button activates when on the Out tab. Select the Order and click Arrival to complete a Delivery order and change the status of the Driver to Standby. If the Order was unpaid, the Cash Payment popup will appear to enter the Amount of Cash given for the Order. After clicking Enter, the Order will be marked as Paid and Closed.
- Cancel Order: Select the Order then click Cancel Order. If payment was made on the Order, the Order will open to the payment screen with a message 'Payment(s) made on this Check, Kindly delete the payment to void the Menu Item'. Delete the payment to void/cancel the Order. If no payment was made on the Order, the Void screen will appear. After selecting/entering a Void Reason, the Check will be voided.
- Pay Check: Select a Check then select Pay Check: the Payment screen appears. For To Go orders: once payment is successful, click Submit and the Order will be closed out. For Delivery orders: once payment is successful, click Back and then Finish. If Submit is clicked, the message 'Delivery orders cannot be submitted here. Please use the phone order arrival option' appears.
- Print: Select a Check then select Print to print the itemized Customer Receipt for the selected Order.
- Operation: The Operation screen appears.
Related Articles
POS: Bar Tab - Overview
A Bar Tab is a convenience for both Bartenders and their Customers. By opening a Tab, it allows you to order a Drink while not having to perform a Transaction for each Drink. This helps everyone by saving time - and frees up the Bartender to perform ...POS: Phone / Web Orders - Editing Future Orders
POS Navigation: Log in to POS, select Phone/Web Orders > Future Orders Selecting a Date and Time You will have the provision to adjust the Future Order's Date and Time. Selecting a Past Time and Date won't be allowed to be set for Future Orders. Any ...POS: Phone / Web Orders - Driver Tracking
Back Office Settings Requirements Prerequisite for Drivers In Back Office for your Store: Select User Management > Users. The selected user's Role options must include Driver (the Driver toggle must be enabled). Prerequisite for Online/Offline ...POS: Phone / Web Orders - Complete Tab
Orders that display in the Out tab are completed For Here, To Go and Delivery orders. For Here and To Go orders are completed once the Order has been paid in full and closed using the Submit button on the payment screen. Delivery orders are complete ...POS: Phone / Web Orders - Future Tab
Order types that display on the Future tab are For Here, To Go, Delivery and Web Orders that were marked for Later (In-Store) or Future (Online). Sorting Use the filters to quickly sort the orders on the Future tab. All (default) – All future orders ...