Retail POS: Operation - Batch
In POS, select Operation then Batch.
User Dropdown
- The User dropdown contains a list of users (employees), allowing you to choose a specific User from the list.
- Once a User is selected, you can view a list of transactions carried out by that selected User.
Device Dropdown
- The Device dropdown contains a list of devices used to conduct transactions, allowing you to choose a specific Device from the list.
- After a the Device, you can view list of transactions performed using that specific Device.
Batch Screen Table
The Batch screen displays a table containing the following columns:
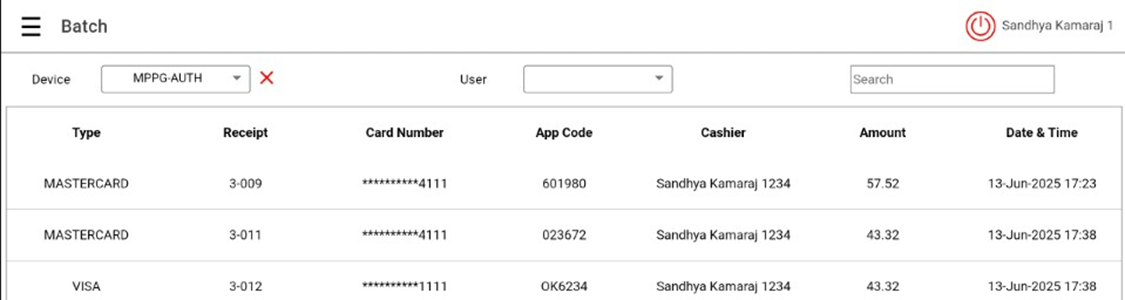
- Type – The card type used
- Receipt – The unique identifying number of the receipt
- Card Number – The number of the card used
- App Code – The App code
- Employee – The Name of the employee
- Amount – The sum total of the transaction
- Date & Time – The Date & Time the transaction was conducted
- The following fields appear at the bottom of the screen:
- Total - The total number of receipts
- Offline - The total number of offline receipts
- Total Amount - The total of the Amount column.
Submit Batch
The Submit Batch and Process Offline buttons are available at the bottom-right of the Batch screen.
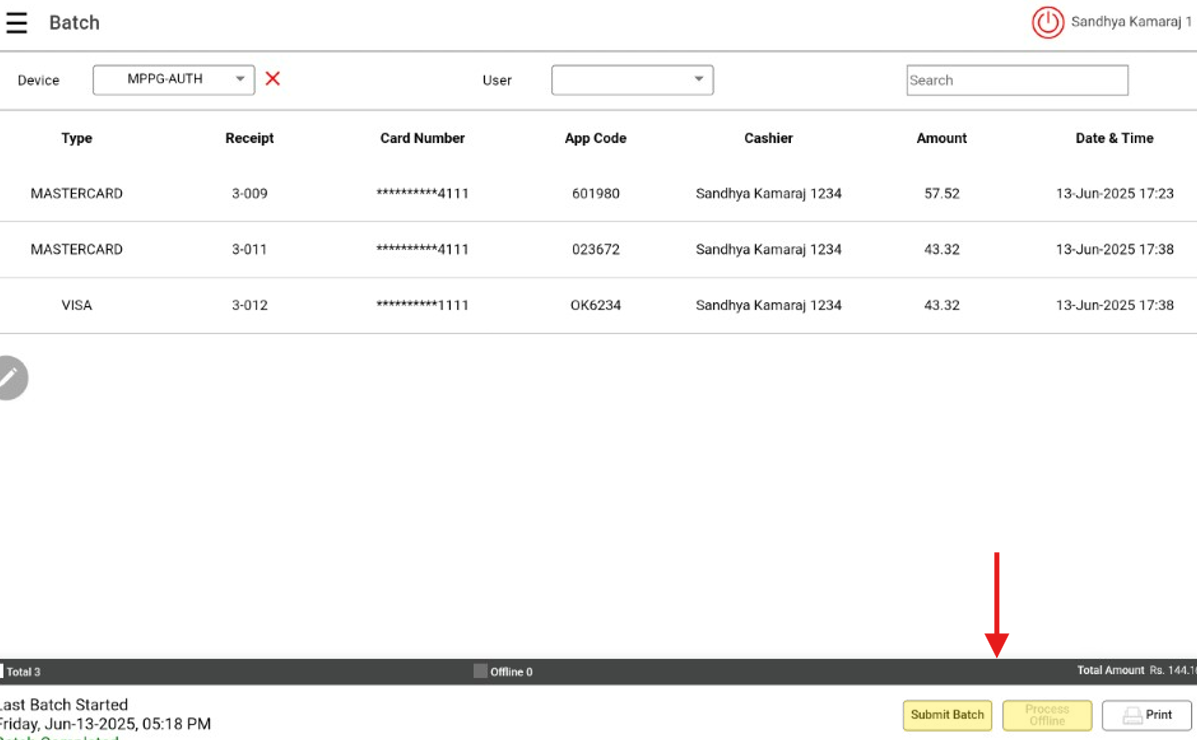
If Submit Batch is selected
- The batch will be submitted on the Back Office side.
- Receipt which are taken during offline will be appear in the batch screen , user has to process the offline receipts by using process offline option in the batch screen
- If use click Submit batch without processing offline receipts, offline receipt will not be batched.
- If the batch process is successful, the transactions will be cleared.
- If there is an error in batching, it will be highlighted with a Dark Red color.
- Search option will be provide to search the receipts in the screen
- Print option will be provided in the bottom right corner of the screen which is used to print the data of the receipts in the batch.
- Note: Other functionalities such as offline process will work as in process
Auto Batch for SPPAX
- In BO you must enable the Auto Batch then set the Time for Auto Batch.
- Log in to POS and click Batch. It will navigate to the new screen where list of card payments appear.
- Select the device from the drop down then click Submit Batch. The system will perform Auto Batch automatically for the respective time configured in BO.
- For SPPAX Device, Auto Batch will be initiated from the POS side. SPPAX device should be connected to POS while performing auto batch to complete the batch process.
- If SPPAX device is not connected at the time of batch process: the message 'Unable to connect to PAX device' appears on all POS screens and batch will not be initiated.
- Once the batch has been completed, the message 'Batch Completed' appears at the bottom-left.
- Print Batch Report – Applies to manual batch only (not to Auto Batch).
Batch Settle Date & Status
On the Batch screen: the Settle Date and Status of the Batch will appear at the bottom-left of the screen.
Last Batch Started with batch transaction Day, Date, Time, and Status of the batch .
Note:
- Date and Time format configured in BO will be reflect the batch settle date.
- Batch status will appear for MPPG payments.
Batch Completed
- After the batch has processed, Batch Completed will appear.
Batch In Progress
- If the Batch is processing, Batch In Progress will appear in green.
- While the Batch is in-progress, the Submit Batch button will be disabled and can't be clicked.
Batch Incomplete – Resubmit Batch
- If Batch processing is incomplete, Batch Incomplete – Resubmit Batch will appear in red.
Printing Batch Report
Batch report prints for all payment types will appear when the Print Batch Report toggle is set as Yes.
Back Office
Navigation: Log into Back office for your Store, then select Settings > Batch Settings
The Print Batch Report toggle will be disabled (NO) by default. If enabled the Batch Report will be printed after submitting the Batch.
POS
- If the toggle is enabled and the batch is submitted, the Batch Report will automatically be printed for submitted Receipts.
- If the toggle is disabled and the batch is submitted, the Batch Report will not be printed after submitting the batch from the Batch screen.
- Any payments made via Credit Card, SPPax, MPPG, or eDynamo will appear on the Batch screen.
Payments
For MPPG, SPPAX, and Clover payments the Batch Report will automatically be printed.
Notes
- If the batch is printed before submitting, then you can take the batch print. The Batch print will be printed after the batch (based on the Back Office option).
- The batch will print only for the Manual Batch.
- If Offline transactions are processed, it will not print.
- Refund can be only processed once the batch is completed.
Related Articles
Retail POS: Operation - Close Day
Introduction Close Day is the last step before ending the Business Day. Note: Only Employees with the proper Role and Permissions settings have access to Close Day. Navigation: Log in to POS, then select Operations > Close Day Or Operation > Till ...Retail POS: Operation - POS Settings
Navigation: Log into POS, then select Operation > POS Settings Note: Only Employees with the proper Role and Permission settings have access to POS Settings. Till Settings This section is used to define the behavior of Till Management. Back Office ...Retail POS: Clover Payments
Configuration in Back Office Admin On the Admin page, enable the Clover Payment toggle (set to YES). Configuration in Back Office Navigation: Select Settings > Payment > Payment Method Payment Method When creating a new Payment Method (or updating an ...Retail POS: Operation - Till Management (Reports Tab)
The Reports tab under Till Management is used to view the total sales done by the employee in the current system date. The report displays the data about the Total Net Sales, Gross Sale, New Customers, Net Void, and Sale Recap Summary. Print Select ...Retail Back Office: User Management - Roles
Navigation: Sign into the Back Office for your Retail Store, then select User Management > Roles The Roles page appears, which displays a table of the currently existing Roles within this Retail Store, with the following columns: Create a New Role or ...