Retail Back Office: Admin - Dashboard
Navigation: Log in to Dealer
Admin, then select Dashboard.
On the Dashboard, you will
be able to view the tiles displaying amounts such as the number of Stores using types of plans Core/Basic, Pro, and Enterprise - as well as Sales data broken down by periods of Days.
Under the tiles is a table displaying the Accounts
under this Dealer, columns such as Name, Account Type,
Device, Store, Email, Date Created, Show Upgrade and Status.
Bulk Update Version
The Bulk Update Version dropdown displays all iPad versions. You can choose any version then click Update All. All Accounts under this Dealer will be updated.
Create or Update an Account
To create a new Account, click New Account. To update an existing Account, click the account Name. The Account Details screen appears.
Account Details
- Account Name: The name of the Account (not editable when updating).
- Phone Number: The contact phone number for the Account (not editable when updating).
- Email ID: The contact Email Address for the account (not editable when updating).
- Store Address: The physical/mailing address of the Account will appear here.
Subscription Details
Plan Details
- Plan: The type of plan this Account is subscribed to (Basic,
Pro, Enterprise).
- Licenses: This will display the appropriate license count for this account.
- Stores (Active/Inactive): Displays the Active/Inactive stores under this Account.
- Date Created: This displays which date this account has been created.
- Last POS Access Date: This displays the last date when POS accessed for this account.
Features
Select to expand the options, then Name, Status and Number of Stores will appear. This
shows the relevant features that are associated with this account are displayed
and also this shows the status of the features such as Active or Inactive
status. Also, this features shows how many stores are active this features.
POS License
POS licenses are displayed with their Node ID and iPad App
Version (which includes all Stores).
Account Settings
- Account Level Gift Card - If enabled, then Account level Gift Cards will be available for that particular Account.
- Account Level House Account - If enabled, then an Account Level House Account will be available for that particular Account.
- Enable Net Suite Integration - If enabled, then Net Suite Integration will be available for that particular account.
- Cash Reward with Loyalty - If enabled, then Cash Reward with Loyalty will be available for this account and the message 'Please make sure to configure the cash and non-cash points in the Loyalty screen' appears.
- Enable SMS Loyalty Confirmation - If enabled, Net Suite Integration will be available for that particular account. The new option Twilio Number will appear and you can enter the Number then click Save.
- Customer Level Loyalty - If enabled, Customer Level Loyalty will be available for this account.
- Note: When SMS Loyalty Confirmation is enabled, then Customer Level Loyalty option will be enabled by default and greyed out. You cannot make changes.
- Discounted Loyalty - If enabled, Discounted Loyalty will be available for that particular account.
- Disable Marketing - If enabled, then Disable Marketing will not be available for this account.
- Is FTP Enabled - If enabled, then FTP will be available for this Account. You should be able to enter the Host Name, Port, User Name and Password then click Save.
- Enable New Theme - If enabled, the new theme will be available for that particular account.
DB Information
Upon clicking Generate Sales, the Count and DB Size will appear.
Actions
The Actions dropdown displays multiple Account options.
Upgrade Account
Overview
Click Manage Plan, and a new page with Plans and Addons will appear.
- Based on the selections, the Billing Details will appear. Click +/- to increase/decrease the Quantity.
- You can enter a Coupon Code then click Apply and the Coupon will be applied.
- Total: The Total amount to be charged based on selections.
- Apply Changes: When clicked, the Continue To Payment option will appear. When clicked, the Payment page will appear.
Click Edit to edit the Order
Summary.
- Show Recurring Changes: When clicked, all the selected Plans and Addons will appear.
- Hide Recurring Changes: By clicking it
all the selected plans and addons details will be hidden.
- Procced: Upon clicking proceed, it will take to the Payment Information screen where you can enter the Card details and by clicking Pay the amount will be paid.
- The message 'Thank You! Your payment has been successfully summited. Please allow a few minutes for the changes to be reflected in your account' appears along with the Go to Dashboard option will which return you to the main Dashboard screen.
Billing History
On the Billing History page the following options appear, select the Time Period then click Apply.
- The Billing
History will appear based on the Time Period selection, which includes the Date and Amount will appear.
- Download Invoice: When clicked, the Invoice file will be downloaded in PDF format.
Payment Method
- When selected, the Payment Method screen appears where you can update the card details by entering Card Number, Country/Region, State, City, Address, and Zipcode then click Update Card.
- Under Any Questions, predefined questions and answers will appear.
Cancel Subscription
- When selected, the Cancel Subscription page will appear where you must enter Comments for why you're cancelling the Subscription.
- Upon clicking Undo option the Cancel Subscription page will be closed.
- After entering the comments the Finish Cancellation option will be enabled. When clicked, a pop-up with the message 'Are you sure you want to cancel your subscription?' appears.
- No, Go Back: By clicking it, the pop-up window will be closed.
- Yes, Cancel: By clicking it, the Notes Saved pop-up will appear.
Login
When clicked, you will be logged in to this particular Account.
Show Stores
When clicked, the Store Contents page will appear, with a dropdown that contains all Stores under this Account. Select the relevant Store to make any changes.
Store Detail
- Store Name: Store name will be pre-populated and greyed out and is not editable.
- Phone Number: The Store's Phone Number will be pre-populated and greyed out and is not editable.
- Email ID: Email ID will be pre-populated and greyed out and is not editable.
- Date Created: The details will be pre-populated where it shows the date of creation of this store and is not editable.
- Last Retail Modified Date: This shows the last modifier date of the Retail item for this store and is not editable.
- Last POS Access Date: This shows the last ipad access date for this store and is not editable.
- Store Address: The physical address of the Store will be pre-populated if entered and is not editable.
Subscription Detail
Features
When selected and expanded, a table that displays the Name (of the Account), its Status (Active/Inactive) and its Number of Stores that are Active.
POS License
Displays POS License with Node id and iPad App
Version will appear (which includes for all the stores).
Store Settings
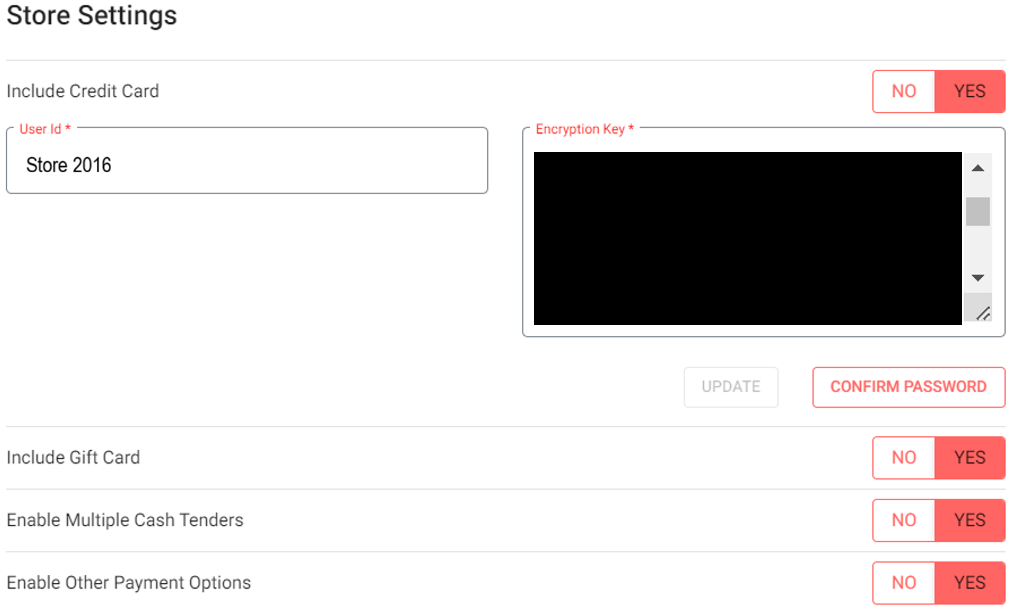
- Include Credit Card - If enabled (YES), the User Id and Encryption Key will be available with update and confirm password options.
- User Id: Enter the User ID.
- Encryption Key: Enter the corresponding Encryption Key.
- After both have been entered, click Update.
- Change Password: Upon clicking on Change Password, you can change this password by entering the current password and new and confirm password option. Once password is entered then click on Save and this new password will be saved successfully.
- Include Gift Card: If enabled (YES), the Include Gift Card will be included for this store.
- Enable Multiple Cash Tenders: If enabled (YES), the Multiple Cash Tenders will available.
- Enable Other Payment Options: If enabled (YES), the Other Payment Options will available.
EMV Settings
If the EMV toggle is disabled (No), then by default the Castle and Go and SPPax toggles will be disabled and grayed out. If EMV is enabled, then the Castle and Go and SPPax toggles will automatically be enabled but you can change them as needed.
Give X Gift Card
If the Give X Gift Card toggle is enabled, the following fields appear for providing Give X Gift Card information:
- User Id: Enter the User Id.
- Primary URL: Enter a Primary URL (if applicable).
- Secondary URL: You can enter a Secondary URL (if applicable).
- Password: Enter the new password.
- Confirm Password: Enter the identical password.
- Update: Click to process the Give X Gift Card related updates.
House Account
If enabled, the House Account will be available.
- Clover Payment: If enabled, the Clover Payment will be available.
- Show Deposit In Sale Recap: If enabled, the following options will appear:
- Include Surcharge In Deposit: If enabled, the toggle surcharge will be included.
- Percentage: Enter the Percentage in this field.
- Update: Click to update your settings.
- SMS Configuration: Will be disabled by default. If enabled, you can configure SMS for this store:
- BID: Select the BID number.
- SMS Review Template ID: Enter the SMS review template ID.
- Email Review Template ID: Enter the Email review template ID.
- Save: Click to update your settings.
- Check Out: If enabled, the below details will be populated:
- Gateway Name: CreditCall will be selected by default.
- Terminal ID: Enter the terminal id here.
- Transaction Key: Enter the transaction key here.
- Country: Select the country from the drop-down list.
- Gateway URL: Enter the gateway URL here.
- Processor Name: By default, FirstData processor should be selected and these processor name should be editable.
- Merchant Name: Enter the merchant name here.
- Merchant Address: Enter the merchant address here.
- Auth Code: enter the auth code.
- Receipt Number ID: Enter the receipt number id here.
- Save: Click to update your settings.
- Membership: If enabled, then Membership will be available for that store.
- Mobile: If enabled, Mobile will be available for that store.
- Score: If enabled, Score will be available for that store.
DB Information
Upon clicking Generate, the Sales Count and
DB Size will appear.
Related Articles
Retail Back Office: Dashboard - Summary
Navigation: Log into the BO for your Store, then on the Home page Dashboard select Summary. Select the Time Period from the dropdown, then click Apply. The Summary dashboard will appear for that selected Time Period. You will be able to view the ...Retail Back Office: Enterprise Dashboard
Navigation: Sign into the Back Office. On the left-side Navigation Panel, click Enterprise. For a moment, your data will load while the banner ‘Please wait while preparing your enterprise metrics’ appears. Then, the Enterprise page is populated. On ...Retail Back Office: Admin - Users
Navigation: Log in to Back Office Admin, then select Users The Users page displays all Admin Users under the Enterprise in the form of a table with the following columns: First Name - The admin user's first name Last Name - The admin user's last name ...Retail Back Office: Dashboard - Inventory
Navigation: Log into the BO for your Store, then on the Home dashboard select Inventory The Inventory dashboard appears. Select the Time Period from the dropdown, then click Apply. The Inventory dashboard will appear for that selected Time Period. ...Retail Back Office: Admin - Announcements
Navigation: Log in to Back Office Admin, then select Announcements The Announcements page displays new features and updates to iPad, Web POS, Back Office, OLO and Subscriptions. The Announcements are displayed in table format which contains the ...