Retail Back Office: Employees Scheduler
Scheduler provides a view of Employees Details via the Employees screen.
- To Add, Edit or Delete Employee information - see the Users screen.
- Only Admin level users are authorized to manage Employee details.
Navigation: Log into Back Office for your Retail Store, then select Scheduler > Employees
The Employees screen displays all the Employees working at the store in a table format with the following columns:
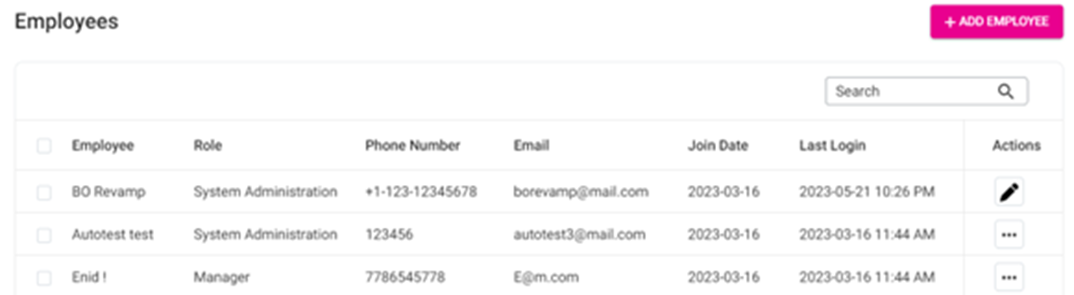
- Employee – The employee’s first and last name.
- Role – The role assigned to the employee.
- Email – The employee’s personal email address.
- Join Date – The date the employee started working at the store.
- Last Login – The most recent date the employee logged in (YYYY-MM-DD HH:MM AM/PM format).
- Actions – Select View or Send Message.
View a Store Employee
Identify the Employee to be viewed, then under the Actions column select the eye icon.

The Employee page appears, broken down into sections:
General
- First Name – (Mandatory) View the employee’s first name.
- Last Name – (Mandatory) View the employee’s last name.
- Phone Number – View the employee’s phone number.
- Email – (Mandatory) View the employee’s email address.
- Date of Birth – View the employee’s date of birth.
- Language – View the language the employee speaks from the dropdown.
- Date of Joining – View the date the employee joined the store.
- Gender – View the employee’s gender.
- Termination Date – (If applicable) View the Date the employee was terminated.
- Termination Reason – (If applicable) View the Reason the employee was terminated.
Access
- Pin – View the employee’s Pin by clicking the eye icon.
- Access Level – View the employee’s level of access from the dropdown.
- Roles – View the Role(s) that apply to the employee from the dropdown.
Address Info
- Address Line 1 – View the number, street name and any Unit/Suite/etc. number of the employee’s Address.
- City – View the name of the City as part of the employee’s Address.
- State – View the name of the State as part of the employee’s Address.
- ZipCode – View the Zip Code as part of the employee’s Address.
Payroll
- View the Employee's Payroll information:
Hourly
- View the employee’s hourly rates, with customization based on days.
- Weekday Rate – View the employee’s hourly rate when working on Mondays to Fridays.
- Saturday Rate – View the employee’s hourly rate when working on Saturdays.
- Sunday Rate – View the employee’s hourly rate when working on Sundays.
- Holiday Rate – View the employee’s hourly rate when working on holidays.
- Timesheet Export Code – View theunique code for the employee to get their Time Sheet and check their details about working Hours and Rates.
Salary
- Salary Rate – View the salary of the employee.
- Timesheet Export Code – View the unique code for the employee to get their Time Sheet and check their details about working Hours and Rates.
Role Based
- Default Hourly Rate – View the standard hourly rate for the employee.
- Timesheet Export Code – View the unique code for the employee to get their Time Sheet and check their details about working Hours and Rates.
Time Off
- View a history of the employee’s Time Off.
Settings
- POS Initial Screen – View the assigned screen the Employee views upon logging in (POS, Table, Bar or Retail).
Related Articles
Retail Back Office: Scheduler
Shift Management can be performed on the Scheduler screen. Navigation: Log into Back Office for your Retail Store, then select Scheduler > Scheduler The Scheduler screen displays the following details and information: Note: The Scheduler screen ...Retail Back Office: Messaging Scheduler
Navigation: Log into Back Office for your Retail Store, then select Scheduler > Messaging Messaging enables Staff to communicate with each other. The Messaging screen is broken down by tabs for Inbox and Sent Items. Inbox Sent Items Inbox Displays ...Retail Back Office: Requests Scheduler
Managers (Admin level) can approve requests for Time Off or Shift Swapping. Employees can approve Shift Swapping requests from their co-workers. Navigation: Log into Back Office for your Retail Store, then select Scheduler then Requests The Requests ...Back Office: Employee Scheduler
Scheduler provides a view of Employees Details via the Employees screen. To Add, Edit or Delete Employee information - see the Users screen. Only Admin level users are authorized to manage Employee details. Log into Back Office then select a Store. ...Retail Back Office: Introduction to Scheduler and Adding It To Your Account
Introduction to Schedules As a component of the Cloud POS software ecosystem, Schedules is a web-based software created for helping restaurant’s manage the Shifts of their staff. Integrated with the Back Office application, restaurants are now able ...