Retail Back Office: Printer Rerouting Hardware Settings
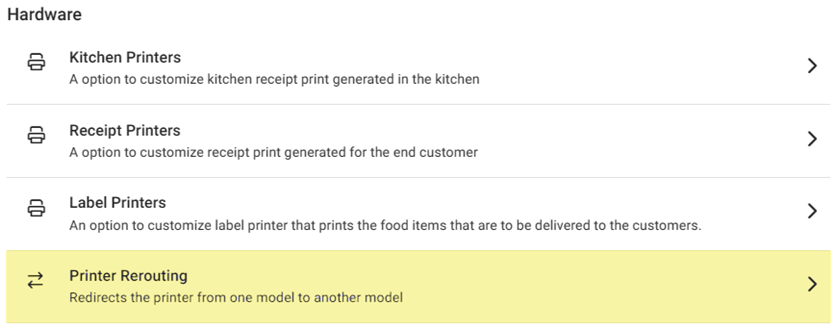
Navigation: Sign into the Back Office for your Retail Store. On the left-side Navigation Panel, click Settings. On the Settings page, under Hardware click Printer Rerouting.
On the Printer Rerouting page, select the tab of whether to Reroute By Node or Reroute By Role.
Reroute By Node
Reroute By Role
Reroute By Node
Displays all the Printers assigned for rerouting based on Node, with a table containing rows representing each added rerouting.
Add or Update a Printer Reroute by Node
- Click + Reroute By Node at the upper-right (or the corresponding pencil icon
under the Actions columns of an existing rerouting from the table). The Re-Route by Node pane appears.
- Select the Node from the dropdown, then select the Printers where the routing will be From and To.
- Select the Availability.
- All Days – The re-routing will occur every day.
- Days Of Week
- Select the Days (Sunday to Saturday).
- Days Of Month
- Select the Days (Calendar View, 1 to 31).
- Restriction Months – If YES, select the Month(s) when re-routing won’t apply.
- Date Range
- Enter the Start and End Dates.
- Restriction Days – If YES, select the Days.
- Specific Date
- Select Date – Select the Date the item will be available for sale.
- Date Range with Time
- Date Range – enter the Start and End Dates.
- Restriction Days – If YES, select the Days.
- Restriction Time – If YES, select the Start and End Times.
- When ready, click Save (or Update) at the bottom-right of the pane.
- Note: The Save / Update button won't be clickable unless all mandatory fields have been filled in.
- You are returned to the main Printer Rerouting under the Reroute by Node tab, with 'Printer Reroute Saved/Updated Successfully' confirmation pop-up appearing at the upper-right.
Reroute By Role
Displays all the Printers assigned to rerouting based on Role, with a table containing rows representing each added rerouting.
Add or Update a Printer Rerouting
- Click + Reroute By Role at the upper-right (or the corresponding pencil icon
- To delete a Rerouting, click the corresponding trash can icon
. The Delete pop-up appears, then click Delete to confirm deletion of the Rerouting.
- Select the Role from the dropdown, then select the From and To Printers.
- Select the Availability.
- All Days – The re-routing will occur every day.
- Days Of Week
- Select the Days (Sunday to Saturday).
- Days Of Month
- Select the Days (Calendar View, 1 to 31).
- Restriction Months – If YES, select the Month(s) when re-routing won’t apply.
- Date Range
- Enter the Start and End Dates.
- Restriction Days – If YES, select the Days.
- Specific Date
- Select Date – Select the Date the item will be available for sale.
- Date Range with Time
- Date Range – enter the Start and End Dates.
- Restriction Days – If YES, select the Days.
- Restriction Time – If YES, select the Start and End Times.
- When ready, click Save (or Update) at the bottom-right of the pane.
- Note: The Save / Update button won't be clickable unless all mandatory fields have been filled in.
- You are returned to the main Printer Rerouting page and Reroute by Role tab, with 'Printer Reroute Saved/Updated Successfully' confirmation pop-up appearing at the upper-right.
Related Articles
Back Office: Printer Hardware Rerouting Settings
Sign into the Back Office. On the left-side Navigation Panel, click Settings. On the Settings page, under Hardware click Printer Rerouting. On the Printer Rerouting page, select the tab of whether to Reroute By Node or Reroute By Role. Reroute By ...Retail Back Office: Label Printer Hardware Settings
Navigation: Sign into the Back Office for your Retail Store. On the left-side Navigation Panel, click Settings. On the Settings page, under Hardware click Label Printers. The Label Printers Settings page displays a table of Label Printers currently ...Retail Back Office: Receipt Printer Hardware Settings
Navigation: Sign into the Back Office. On the left-side Navigation Panel, click Settings. On the Settings page, under Hardware click Receipt Printers. The Receipt Printers settings page is broken down by the Printers and Settings tabs. Printers ...Retail POS: Printer Hardware Settings
Back Office For more information on Printer and Receipt Template settings, see the following Knowledge Articles: Receipt Printers Front End Receipt Template Label Template POS On the Hardware Settings page, select the Printer Settings tab. It ...Back Office: Label Printer Hardware Settings
Sign into the Back Office. On the left-side Navigation Panel, click Settings. On the Settings page, under Hardware click Label Printers. The Label Printers page appears. To add a new Label Printer, click + New Label Printer. The New Label Printer ...