Retail POS: Time Clock
If Time Clock is selected, the Time Clock pop-up login screen appears. Enter the PIN number or Face ID to log in.
Clock In
- When an Employee Clocks-In for the first time that day, the PIN screen will appear.
- Enter the PIN - or click the Time Clock then enter the PIN, and when Login is clicked then the Welcome screen appears.
- If a particular employee has multiple Roles, then a pop-up prompt will appear for selecting the Role for the shift record to start.
- Upon successful validation via PIN, the Welcome Back, [Name] clocked-in screen appears with Break and Clock Out options.
- If validation was unsuccessful, you will remain on the previous Welcome screen.
- On the Login screen: the CLOCK-IN SUCCESS, XXXXXXX message appears, confirm the Employee has been Clocked In along with an X icon to close the message.
Start Break
- When an Employee wants to take any Break: on the Login screen, click on the Time Clock option then enter the PIN and the confirmation screen appears. From there the Break can be taken.
- Each and every time an Employee wants to clock-in or wants to take any Break (or end any Break or Clock Out), then the Time Clock option is selected and the action will be performed.
- When a Clocked-In Employee wants to take any Break: a list of all the Breaks along with the Clock Out option will appear. Here, the Current Time, Day and Date in the Time Clock section along with the text 'Welcome back [Employee Name]', and the message as 'You clocked in at [HH:MM AM/PM]' and all the breaks for that particular day will be listed.
- Upon clicking Cancel: the Employee cannot Clock-In and will be redirected to the previous Clock-In PIN entry screen. The X icon at the top-right corner also redirects to that same screen.
- From that screen: the Breaks, such as Rest Break or Meal Break, and Clock Out has been listed along with its Time duration and Break Type (Paid/Unpaid) which is configured in BO.
- When an Employee selects any Break, such as Rest Break, then the 'SUCCESS, Rest Break Started' message will appear on the Login screen, along with X icon. Upon clicking on the X, the 'SUCCESS...' message will be closed.
End Break
- When an Employee wants to take any Break, then on the Login screen click on the Time Clock option and enter the PIN. From there, the Break can be taken.
- Each and every time an Employee wants to clock-in or wants to Take/End any Break or clock-out then the Time Clock option is selected, and the action is performed.
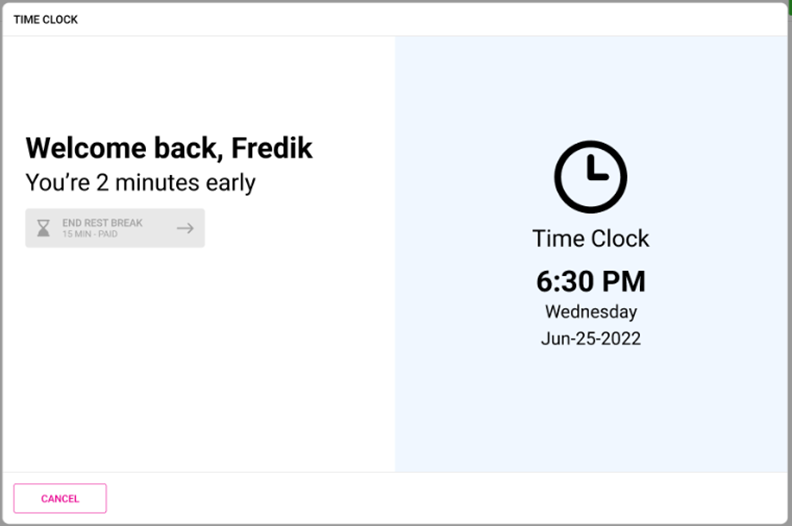
- When user wants to end the applied break, then in the below screen the user will be able to click on 'End XXXXX Break' and here the Break timing will be displayed along with the Break type. Here, the user will be able to view the message as 'Welcome back, XXXXXX' and if the Employee was late within that Break period, then the delayed timing will be displayed as 'You’re [amount of time] late'.
- Here, the Current Time, Day and Date appears in the Time Clock section and at the bottom of the screen the Cancel button will appear. Upon clicking this Cancel button, the Employee cannot Clock-In and they will be redirected to the previous Clock-In PIN entry screen and also the X icon is present at the right corner of the screen which will redirect to the same screen.
- If an Employee forgets any Clock In/Out and/or Break activity, then a Manager will be able to Force the activity only from the Manager screen and in Back Office.
Break Ended Success
When an Employee ends their applied Break, the 'SUCCESS, Rest Break Ended' message will appear at the bottom of the screen, along with X icon. Upon clicking the X, the message will be closed.
Early End Break
When an Employee returns to the Login screen earlier than the Break End Time, then a screen will appear stating that 'Welcome back, [Employee Name] you’re [amount of time] early' and the Employee will not be able to click on the End Break option since the field will be greyed out.
If an Employee wants to end their Break early, only a Manager can perform this action from the Manager screen or from BO (the Employee cannot end their Break early).
When a Clock Out is made, the Declared Cash Tip pop-up appears (and will function as normal).
Multiple Breaks for Employees
- When multiple Breaks are configured in BO, the Break and Clock In/Out options will be grouped together.
- Once a Break is initiated by an Employee, and then they attempt to Clock In: only the corresponding Break that the Employee has started will be visible.
- The respective Employee can end the Break then Clock In to choose other Breaks.
Back Office Time Clock Settings
The Login screen displays Weekday, Date, Time and Version details. The Date and Time format will be based on the below BO settings.
Navigation: Log in to Back Office then select Settings > General Settings
Select the formatting that the POS will follow:
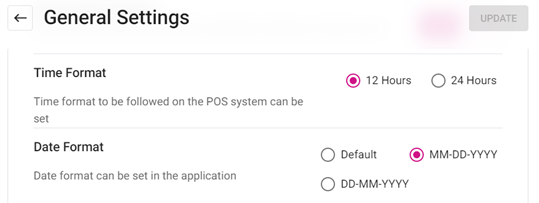
- Time Format – 12 hours or 24 hours
- Date Format – Default, MM-DDYYYY, or DD-MM-YYYY
Related Articles
Retail POS: Active Employee
Back Office Navigation: Log into BO and select a Store, then select User Management > Forced Punch-In/Out Create a New Break On the Forced Punch-In/Out page, click + Time Event. The New Time Event page appears. On the New Time Event page, click + New ...Retail Back Office: Batch Settings
Navigation: Sign into the Back Office for your Retail Store. On the left-side Navigation Panel, click Settings. On the Settings page, under Batch click Batch Settings. On the Batch Settings page: Show Sale Type Transaction in Batch Report – if ...Retail Back Office: Products/Items - Display Groups
Navigate: Log into the Back Office for your Store, then select Products/Items > Display Group Display Groups give you the option to create and sell a predefined combination of Retail Items. The table displays the list of the saved Display Groups with ...Retail Back Office: Subscriptions & Upgrades - Summary
There are 2 plans available for a Retail Subscription: Pro and Enterprise. Add-Ons for Retail The 9 addons available for Retail: Alerts, CDS, Feedback, Insights, Inventory, Loyalty, Marketing, Schedules, and Stock. Billing for Subscription The ...Retail Back Office: Products/Items - Products/Items
Navigation: Log into the BO for your Store, then select Product/Items > Product/Items The Products/Items page appears, which displays a table for Retail Items. Create a New Retail Item (or Update an Existing Retail Item) Click + New Retail Item at ...